 THEREiS
Title :
Building a Home Secretary #2 - Design
This post is translated from the Korean original. Read in Korean →
In part 1, I told the story of how setting out to build a smart glasses app led me to build Secretary, a secretary for my home. Secretary is a service hub running in Docker on a Synology NAS, and whether it’s the glasses, the phone, or the watch, you just send a request and it turns off the lights, sends email, or leaves a memo in Obsidian.
The problem is that I want to use this server from outside too. To use it while I’m on a business trip like now, or on the subway home from work, I have to open my home server to the internet. But this server can turn off the lights in my house, send email in my name, and edit my notes. Getting hacked would be way more than a little inconvenient.
In the secure infrastructure post I lectured at length about “reducing the doors that let people in,” so now it’s my turn to practice what I preached.
My first idea was a “10-second token”
The first approach that came to mind was this. Give each client an Access Key and a Secret Key, use them to get a 10-second temporary token, then call the business APIs with that token. The idea was that the shorter a token lives, the safer it is.
But when I thought it through, there were holes.
- The Secret Key ends up on the client anyway. The side that gets the token and the side holding the Secret Key are the same device. If the device is compromised, everything goes with it, temporary token or not. All the temporary token protects against is roughly “a token leaking in transit and being reused.”
- Every call adds one more round trip. On a path that goes glasses → phone → NAS, latency nearly doubles.
- 10 seconds is too short. Considering clock differences between devices, mobile network latency, and retries, tokens would expire often.
So I changed direction. Instead of getting a token, every request is sent with a signature made with the Secret Key. It’s the same principle as SigV4, which you use when calling AWS APIs.
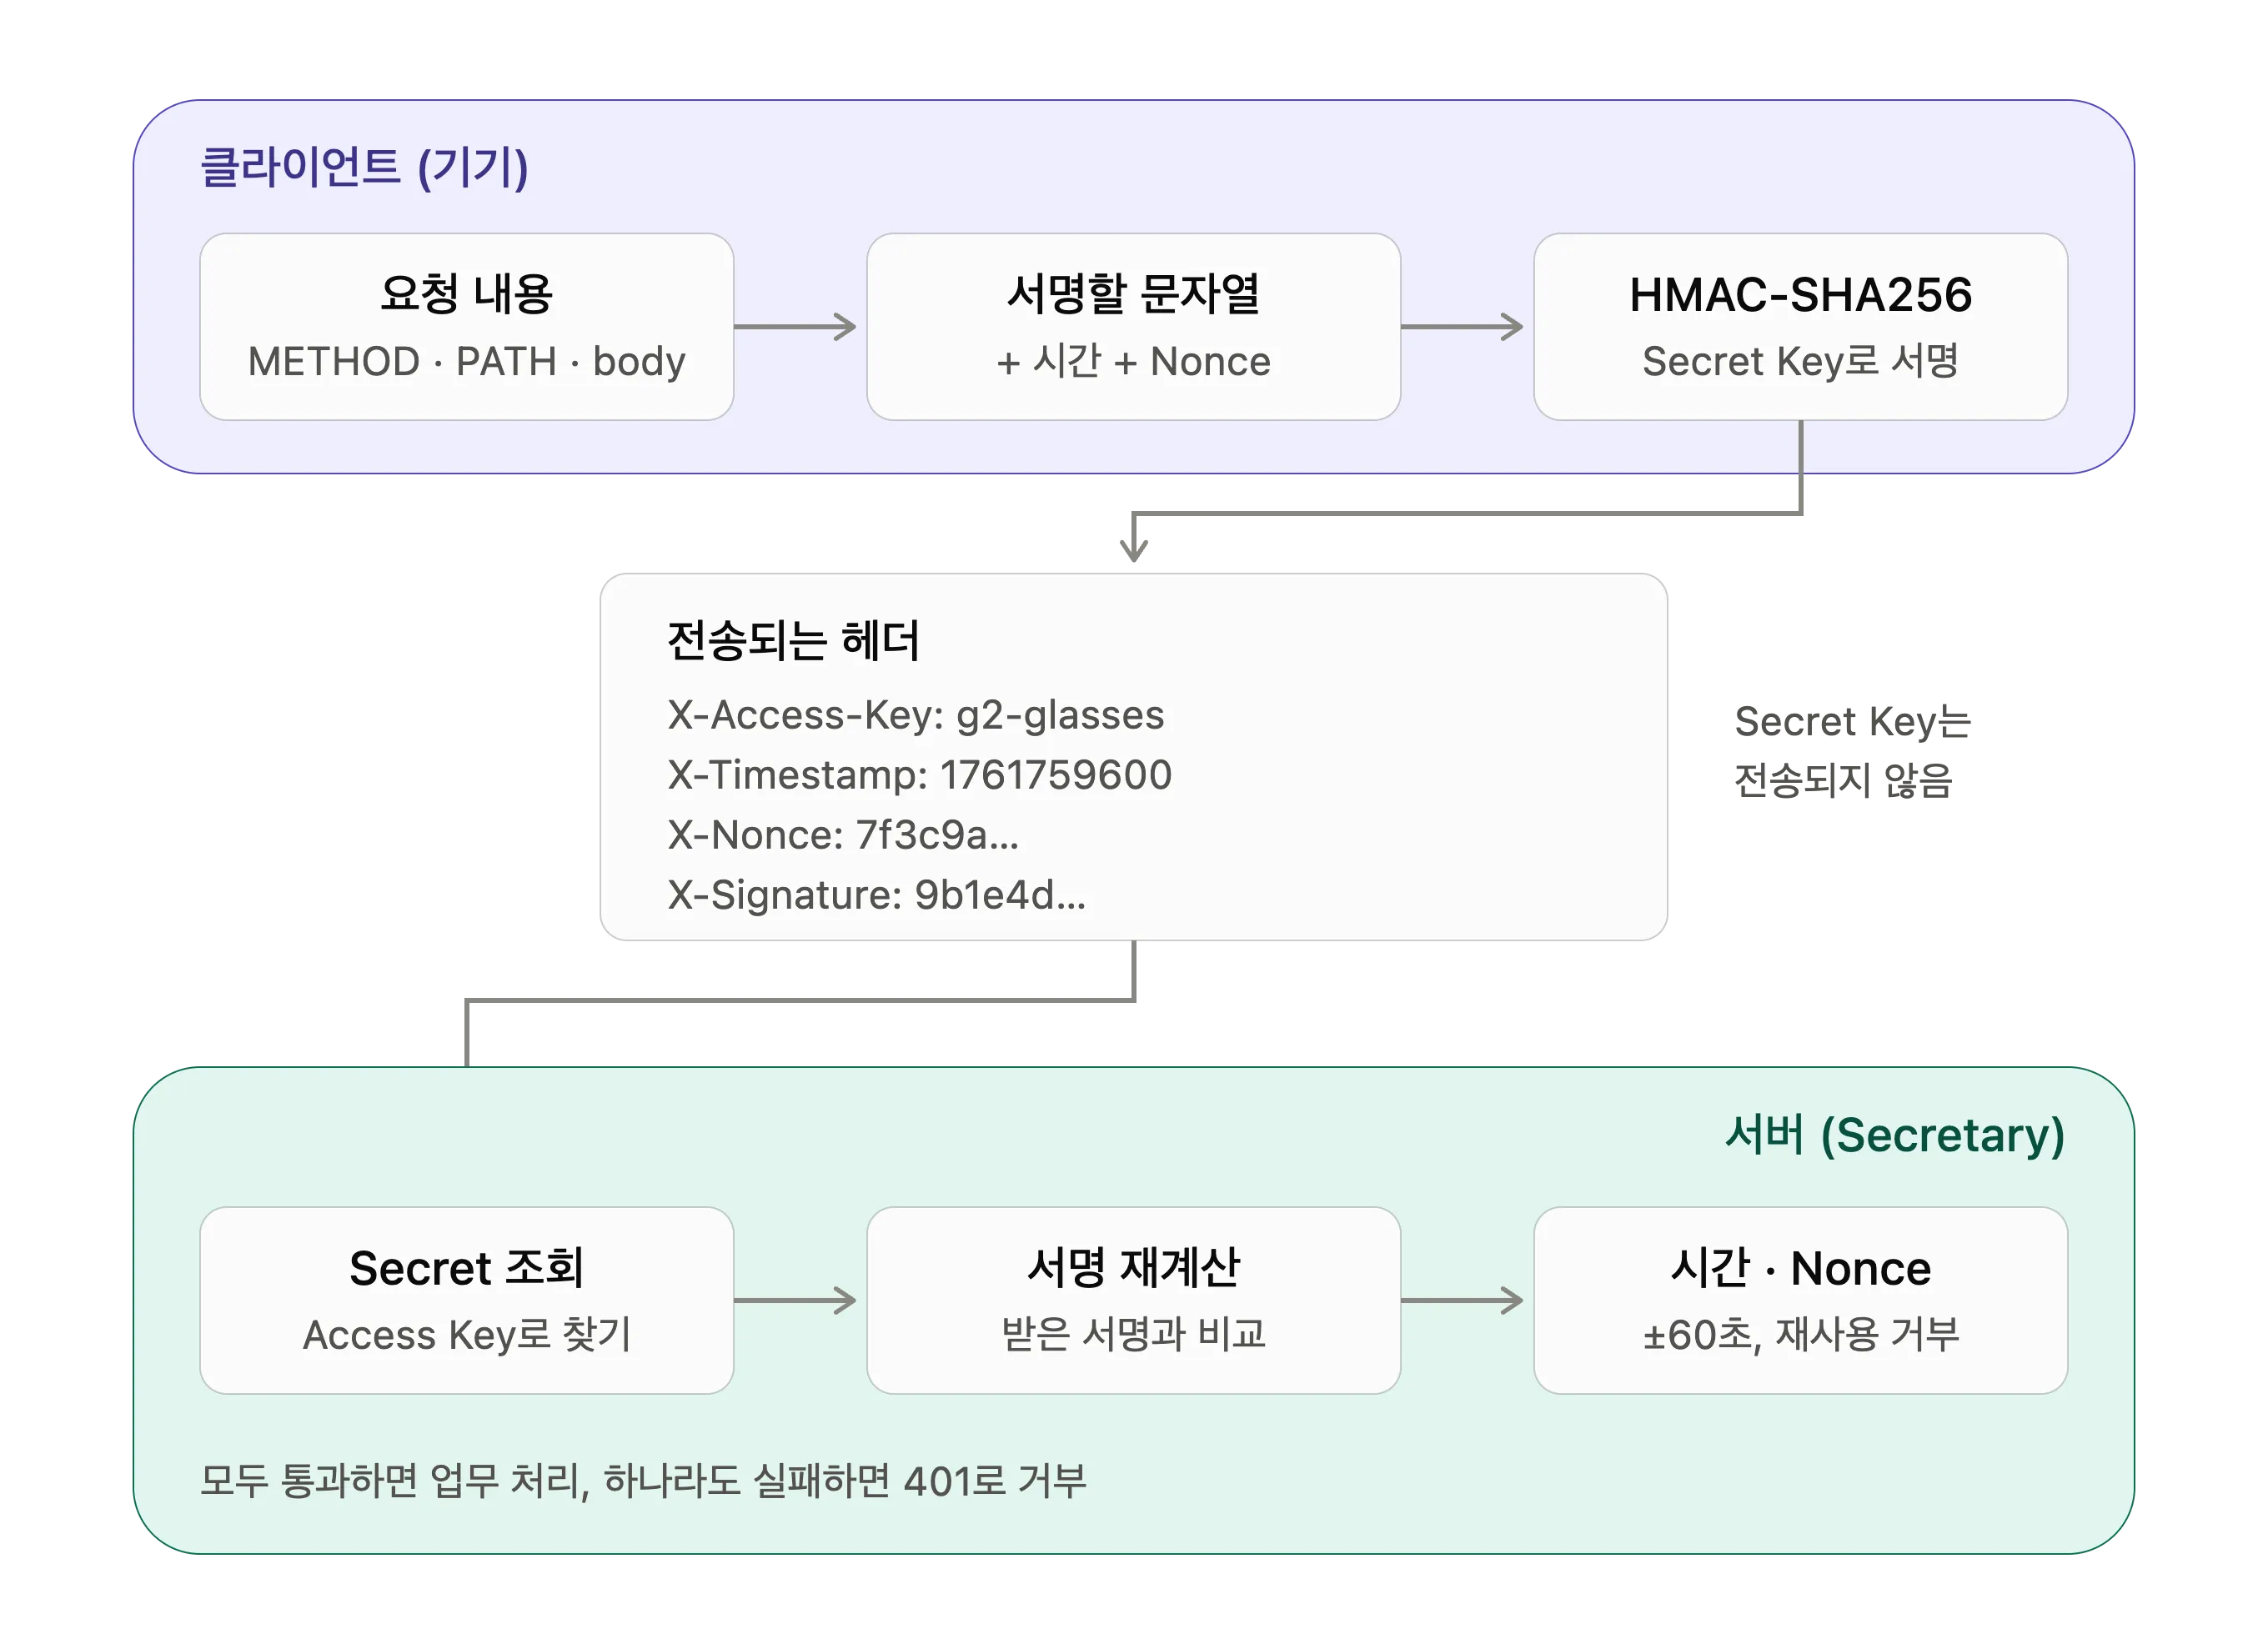
String to sign = METHOD \n PATH \n TIMESTAMP \n NONCE \n SHA256(body)
X-Access-Key: g2-glassesX-Timestamp:  1761759600X-Nonce:      7f3c9a...X-Signature:  HMAC-SHA256(secret, string to sign)
The server looks up the Secret with the Access Key, recomputes the signature, and checks that the timestamp falls within ±30–60 seconds and that the same Nonce hasn’t come in before. This way, the Secret never goes out over the network, intercepted requests can’t be reused, and there are no extra round trips. The original intent of a “short validity window” lives on through timestamp verification.
Security is built in layers
The HMAC signature is just the app-level lock. I set up the whole picture as five layers.
- Network: Not a single NAS port is opened. Unauthenticated requests can’t even reach the NAS.
- App authentication: Each device gets its own key, and every request carries an HMAC signature. If a device is lost, only that key is revoked.
- Action risk level: Lookups need only a signature; light control needs a signature plus a permission scope; irreversible actions like sending email or a git push need one more approval from another device. If you want to send email from the glasses, it only actually goes out after a tap on the watch or phone. Deleting things or issuing keys is blocked from outside entirely.
- Limiting the blast radius: SES uses an IAM key that only allows
ses:SendEmailfrom a specific sender address, and Gitea uses a bot account with write access to just the one vault repository. Containers run as non-root users. - Monitoring: Every request is written to an audit log, and when authentication failures pile up or a new device is registered, I get notified via Kakao “send to me.”
The goal is that even if one key is stolen, the most an attacker can do ends at the level of “turning lights off and on.”
VPN or Cloudflare?
For the first layer, how to lock down the network, there were two options.
- A VPN like Tailscale: The server is visible only from my devices. It’s the most solid, since it’s never exposed to the internet at all. But the VPN has to be on all the time on the phone, and it can’t be used together with other VPNs.
- Cloudflare Tunnel + Cloudflare Access: Punch a tunnel from inside to outside, from the NAS to Cloudflare. No need to open router ports. Then Access guards the front, sending unauthenticated requests away right at Cloudflare.
Since the G2 and the watch both ultimately reach the server through the phone, a VPN would have worked fine too, but I chose Cloudflare because nothing needs to be installed on the client side. Devices just attach an Access service token to the request headers.
I looked at the cost too. Cloudflare Zero Trust’s free plan includes unlimited Tunnels and Access for up to 50 users. For a home server used by one person, it’s free.
I bought another domain because of my domain
The catch was DNS. My domain is managed in AWS Route53, and Cloudflare’s free plan only works if you move the DNS for the whole domain to Cloudflare. Delegating a single subdomain is a Business or Enterprise plan feature. That domain is loaded with SES email authentication records (DKIM, SPF, DMARC), and all sorts of other services are stuck onto it too, so I didn’t want to touch my email infrastructure just for one home server.
So I bought a new domain just for Secretary. I got a ****.house. It’s a secretary that lives at home, so I picked house. It cost $34.20 a year. I get that the companies running DNS servers need operating costs too, but it made me think: even cheap development costs money.
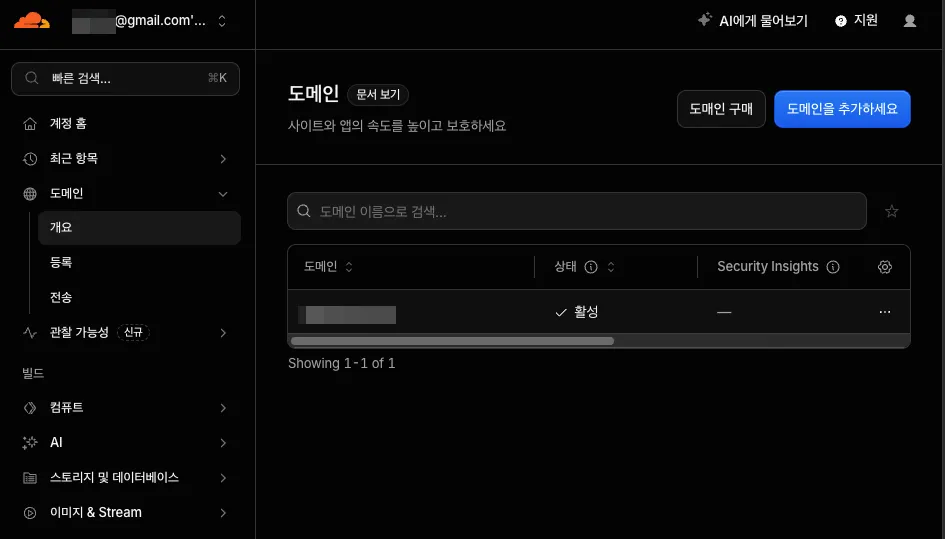
Since I bought it directly from Cloudflare, the DNS went straight onto Cloudflare without having to change name servers. And that’s how the only part of this project that costs money was wrapped up.

Getting started with Zero Trust
I used the Cloudflare dashboard in Korean, so the screenshots below show the Korean UI. The menu and button names in this post (“Service Auth”, “Published application”, and so on) are my own translations and may differ slightly from the wording in the English dashboard.
Cloudflare has a service(?) called Zero Trust, which is, how should I put it… a service that makes authentication and security-related services easier to use. The tunnel we’re about to set up has to be done through here too, so let’s start(?) with “Get started with Zero Trust.”
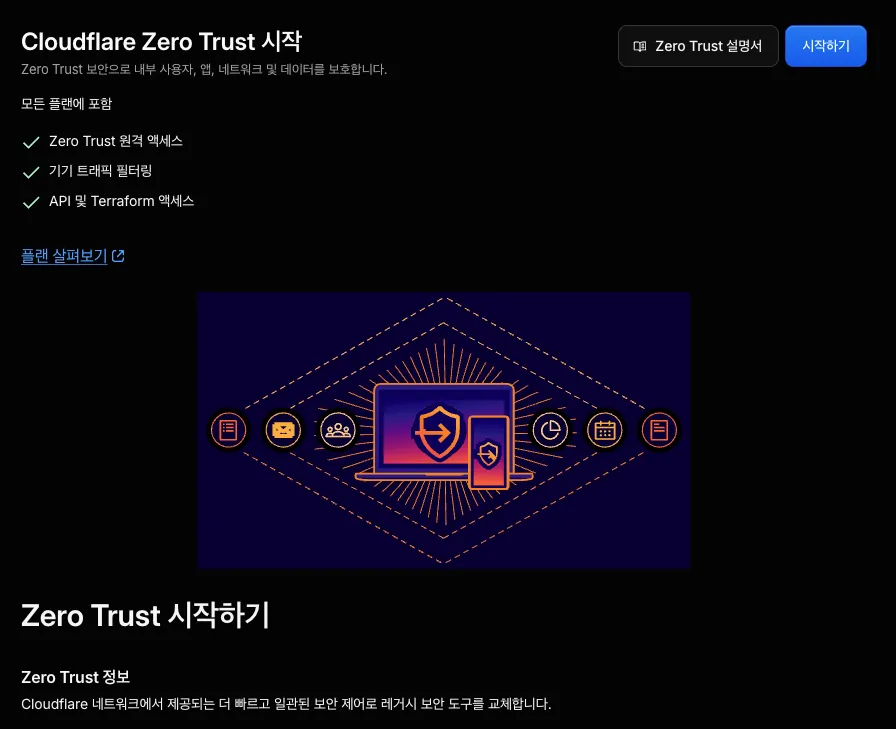
I’m only using it personally anyway, so I chose the free plan.
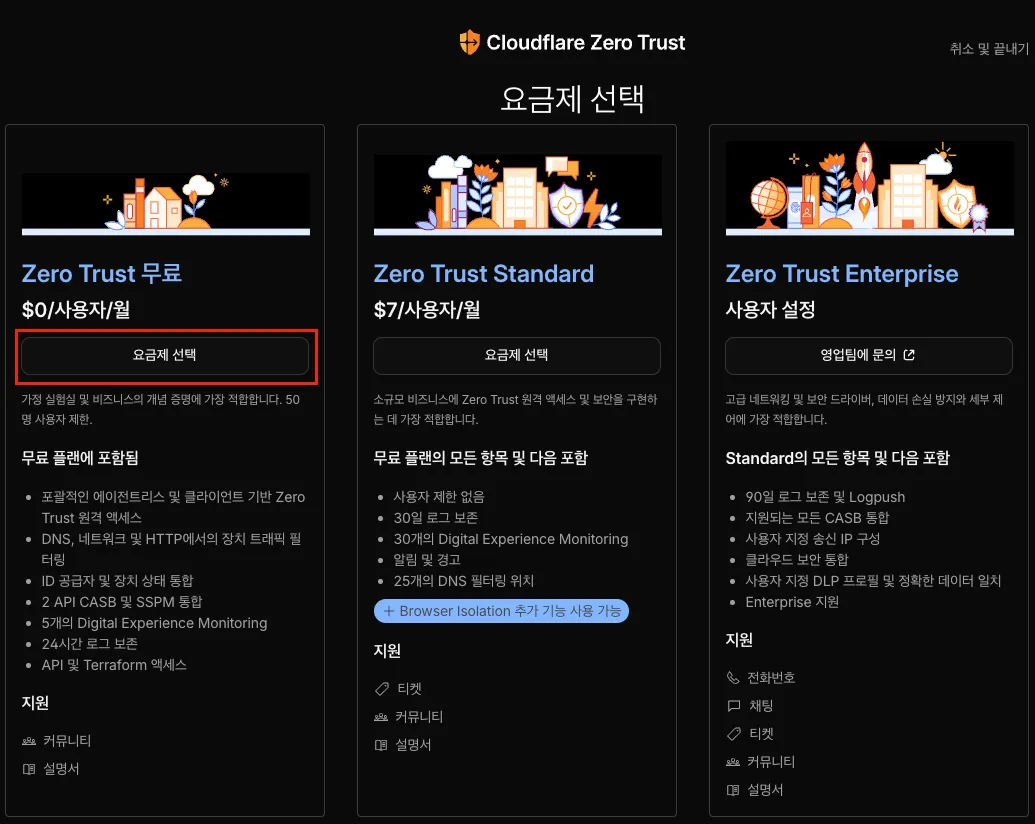
Once you choose it, the activation screen appears.
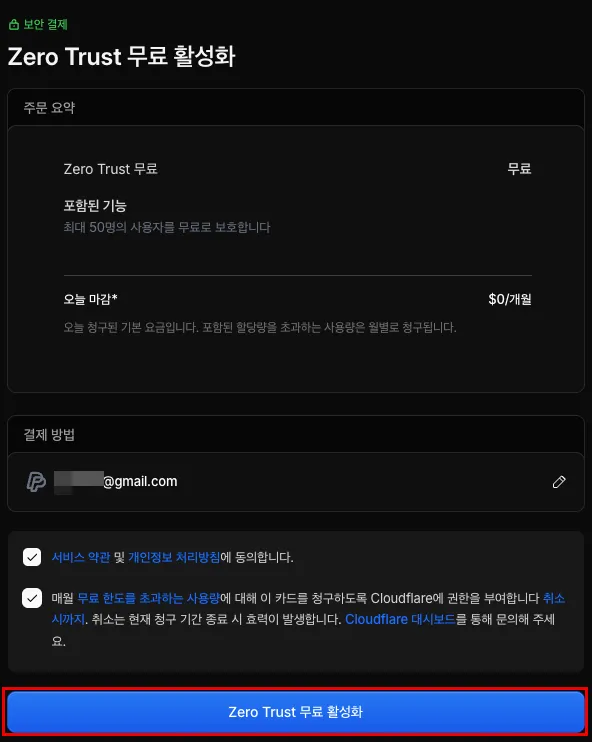
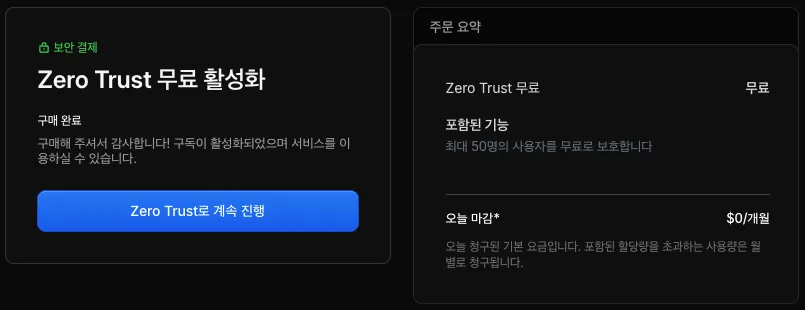
Follow these steps and you’ll be able to use Zero Trust.
Punching the tunnel
Once you’ve started Zero Trust, the next job is to create a tunnel in Cloudflare. For that, first go into the Tunnels menu.
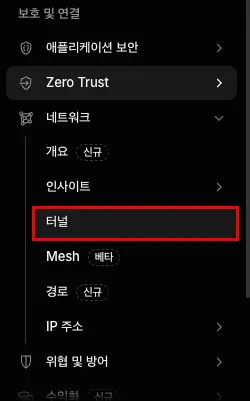
Go into the Tunnels menu inside Zero Trust.
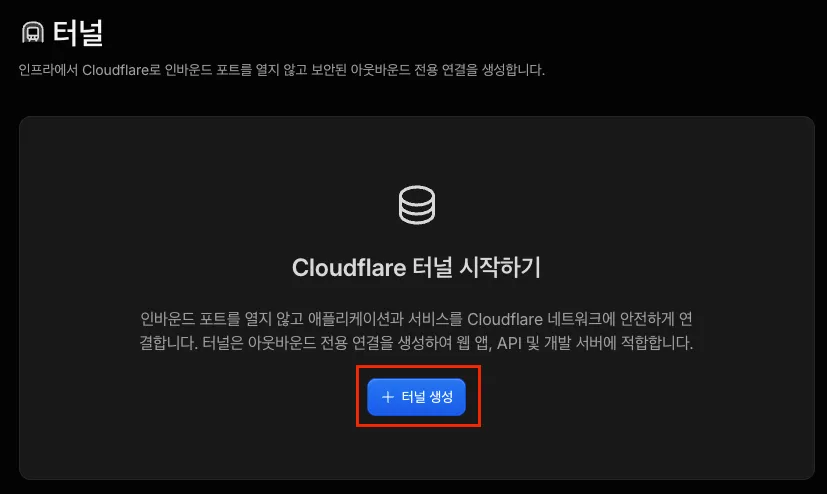
It all starts with clicking “Create a tunnel.”
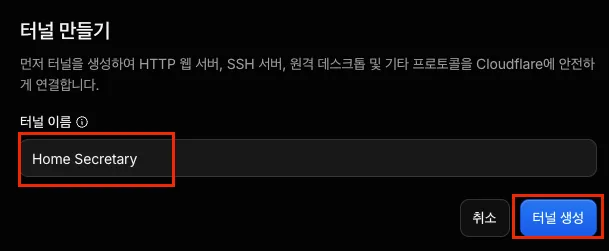
I named my tunnel “Home Secretary.”
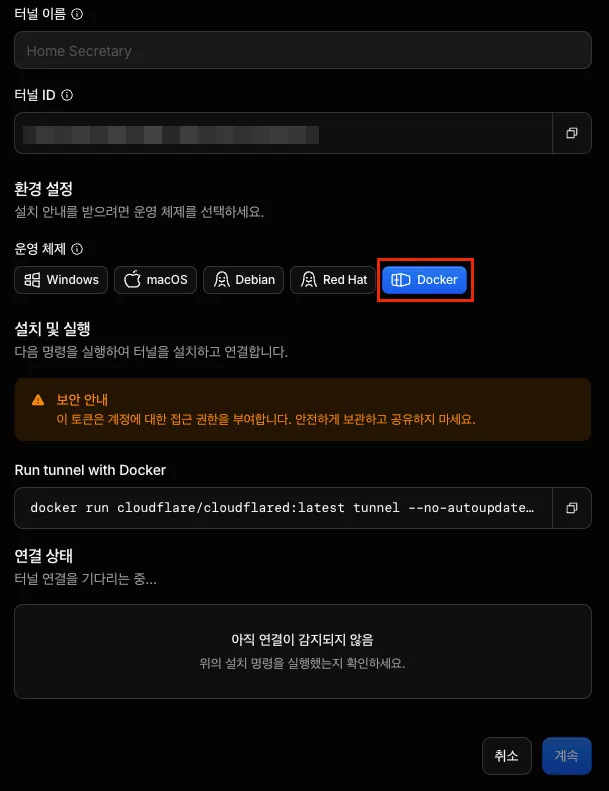
We’re setting up the environment with Docker, so choose Docker. Copy the command under Run tunnel with Docker. You’ll need the token value inside that command when creating the Docker image. Now let’s head over to the NAS for a moment to create the Docker image. Don’t close the Tunnel page yet. We’ll come back after creating the Docker image.
If you did close it, go back to the beginning and do it again.
Setting up Synology Container Manager
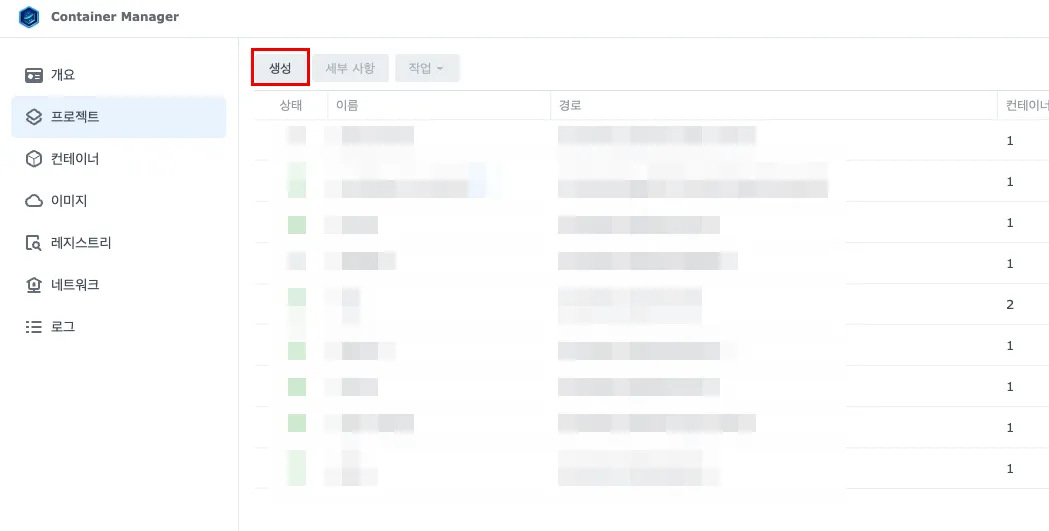
As I said, I created the Docker image through Container Manager on my Synology NAS. Open Container Manager and click “Project > Create.”
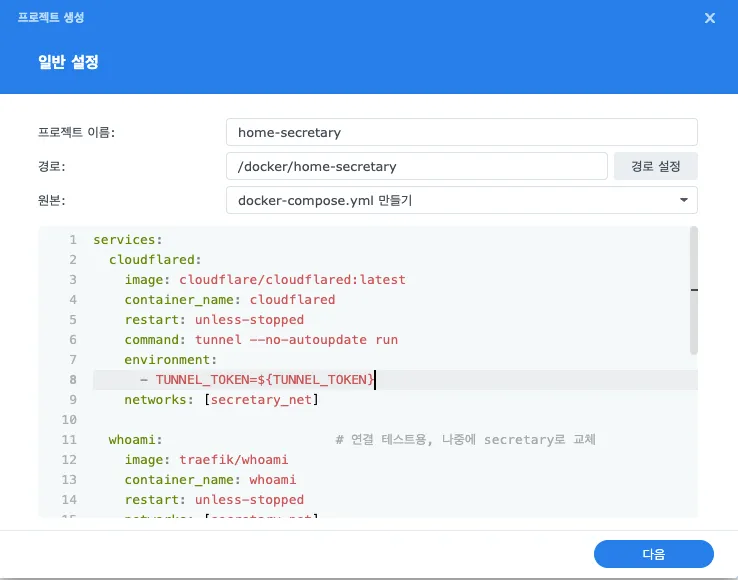
Here’s the docker-compose.yml used to create the image.
services:  cloudflared:    image: cloudflare/cloudflared:latest    container_name: cloudflared    restart: unless-stopped    command: tunnel --no-autoupdate run    environment:      - TUNNEL_TOKEN=${TUNNEL_TOKEN}    networks: [secretary_net]
  whoami:                      # For connection testing, replaced with secretary later    image: traefik/whoami    container_name: whoami    restart: unless-stopped    networks: [secretary_net]
networks:  secretary_net:    name: secretary_net
I added the networks setting so it’s easy to put the services I build later on the same network. For ${TUNNEL_TOKEN} here, paste the Docker command you copied from the last screen of creating the tunnel and you’ll find the token value in it. Use that value.
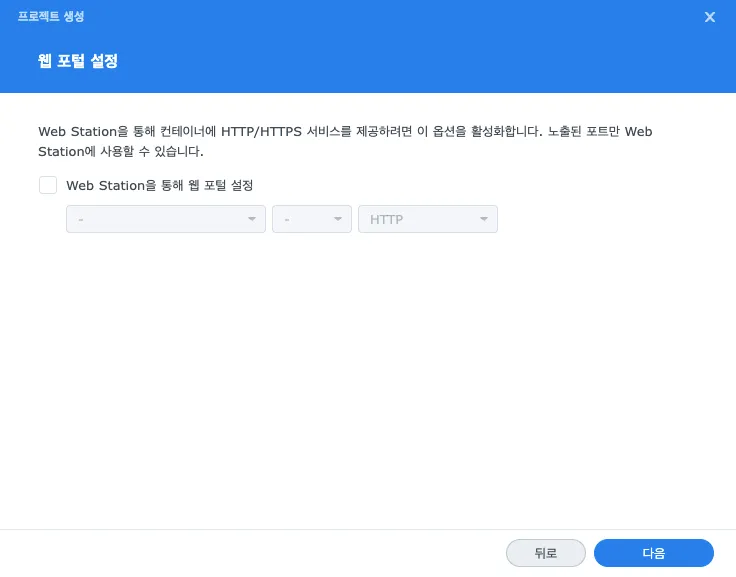
We don’t use the web portal. Because we won’t open any ports and will communicate only through the tunnel. From outside, nobody gets in without going through Cloudflare’s tunnel. So don’t set it up!
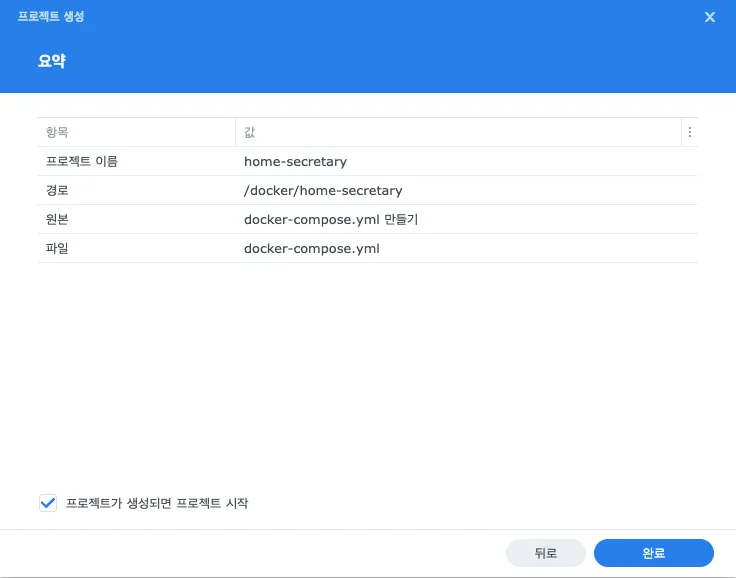
The final review screen. Click “Done.”
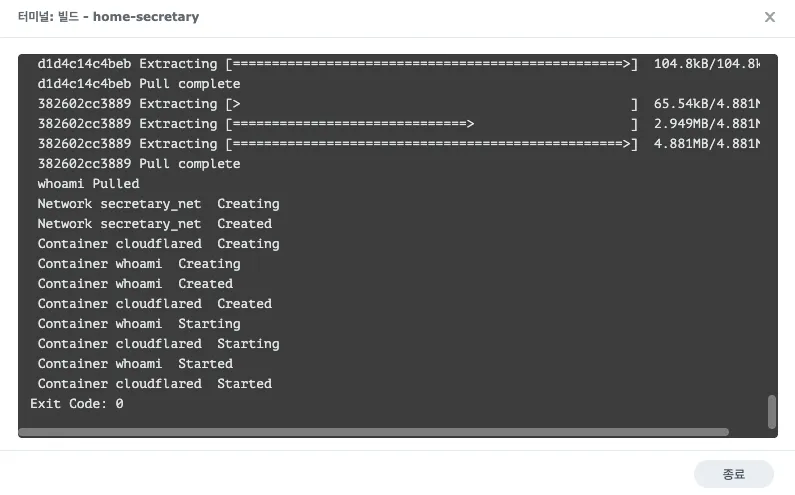
The image was created successfully.
Back to the create tunnel screen
If the Docker image was created successfully, go back to the window where you were creating the tunnel, and you’ll see a message saying the tunnel connected successfully, like below.
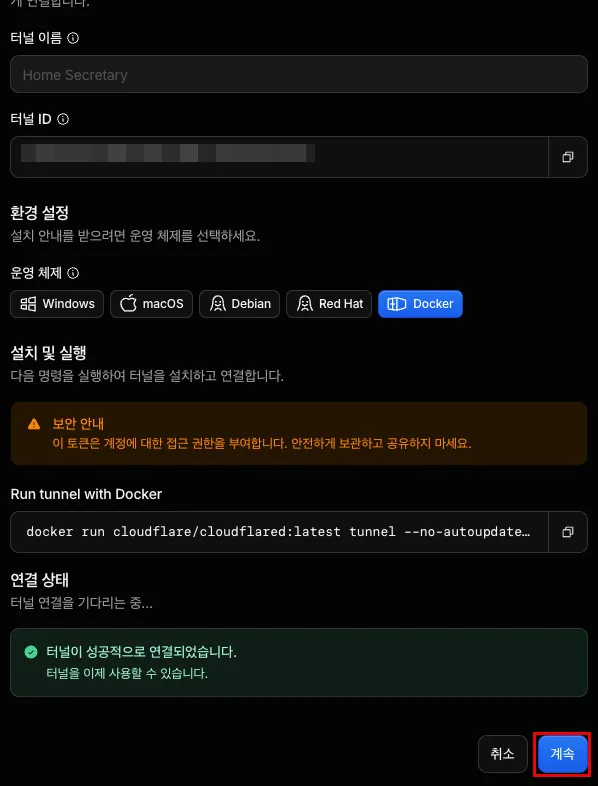
Press the “Continue” button.
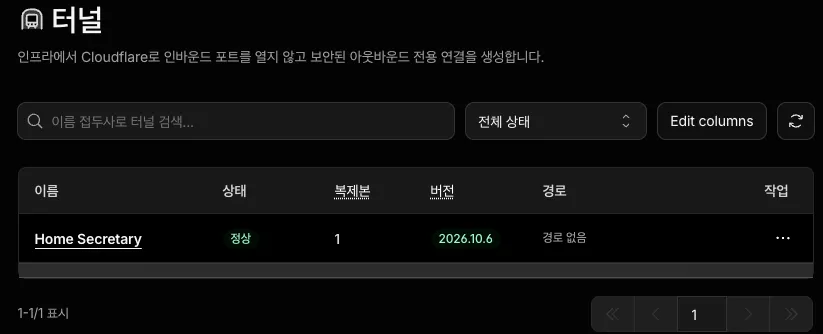
You can see the tunnel was created successfully.
Tunnel creation recap
Create a tunnel in the Zero Trust dashboard (type: Cloudflared), and run the cloudflared container on the NAS with the issued token. Secretary doesn’t exist yet, so I attached a whoami container for testing, which simply shows the headers of the requests it receives.
The key point is that whoami has no ports at all. This container can’t be reached directly from outside the NAS, and not even from the home LAN. It can only be reached through cloudflared on the same Docker network. Secretary will be attached the same way later.
Locking it with Access
Creating a service token
Next is setting up the gatekeeper. Devices can’t log in like people, so they use a service token. Creating a token gives you a Client ID and a Client Secret, and attaching CF-Access-Client-Id and CF-Access-Client-Secret to the request headers lets you through. The Secret is shown only once when created, so save it right away.
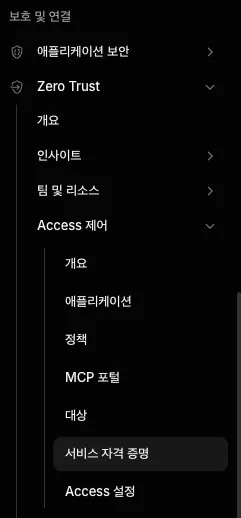
First, go to the “Service credentials” page.
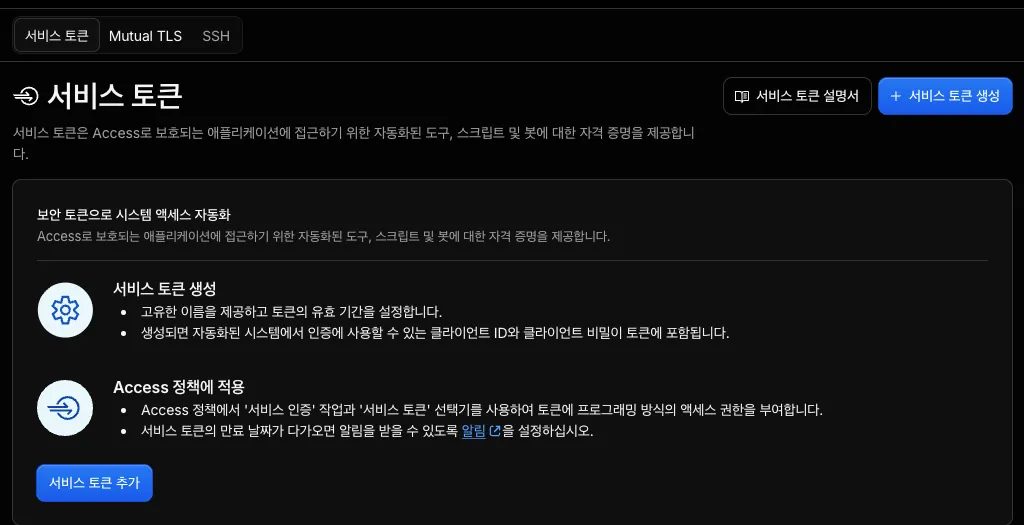
Press the “Create service token” button.
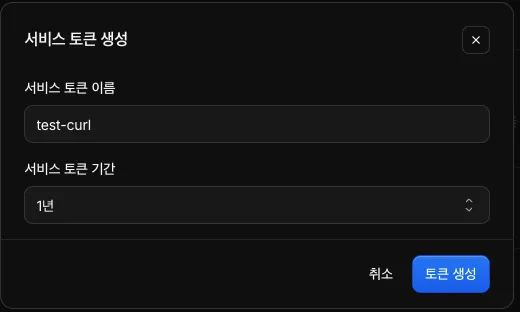
You can create a service token here. For testing, I named it “test-curl” and set the token duration to 1 year.
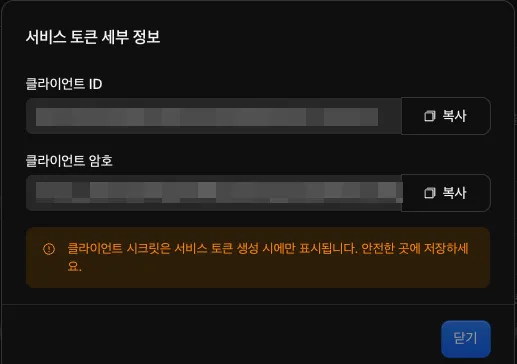
A Client ID and a Client Secret are issued, so write them down somewhere safe. You can find the Client ID again after closing this window, but the Client Secret is gone forever the moment you close this screen.
Creating an application
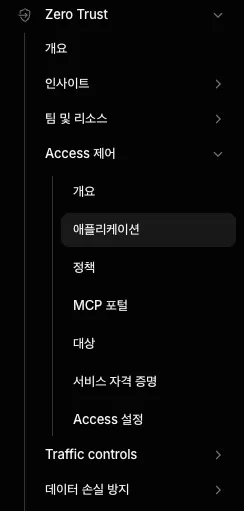
Go to Applications. Here we’ll create an application that authenticates using the token we just issued.
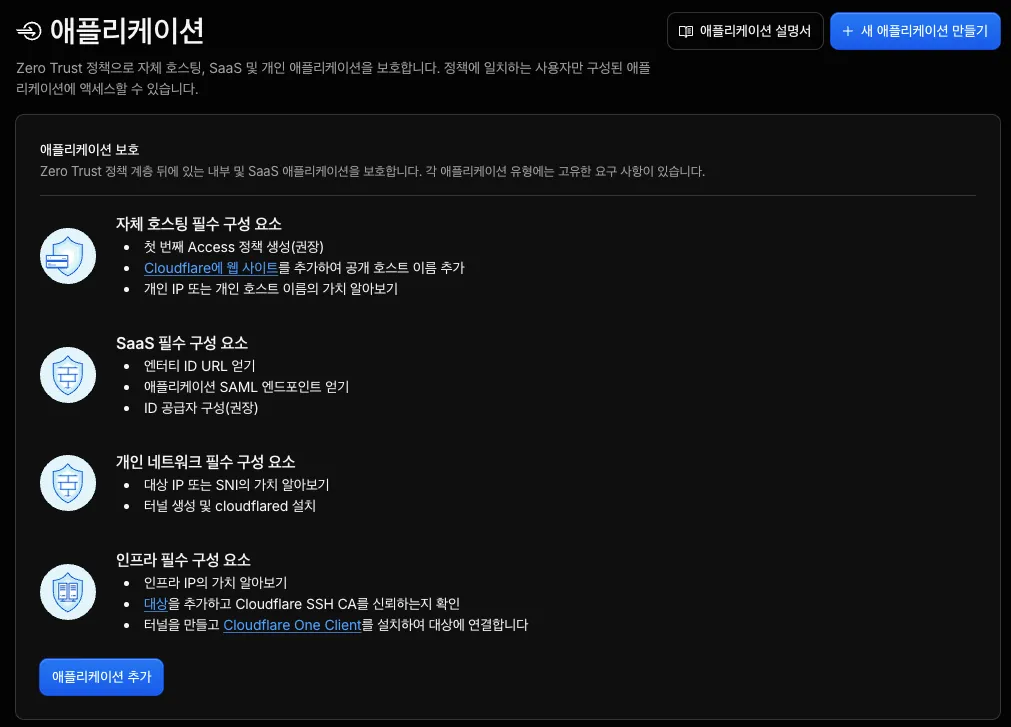
Press the “Create new application” button.
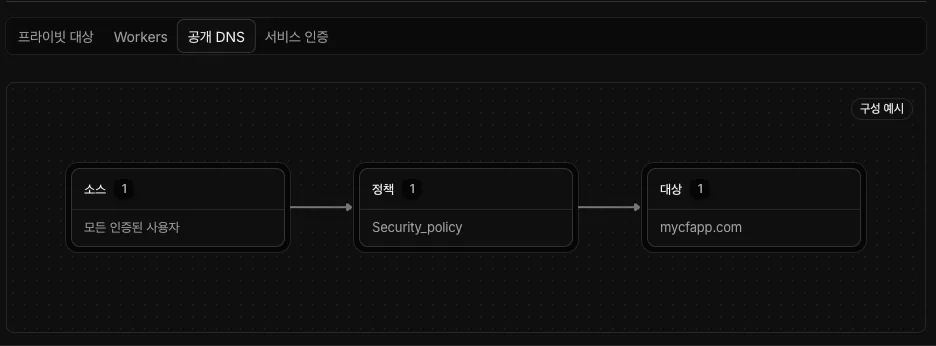
We need to create it with public DNS. Because it has to be reachable from external networks too.
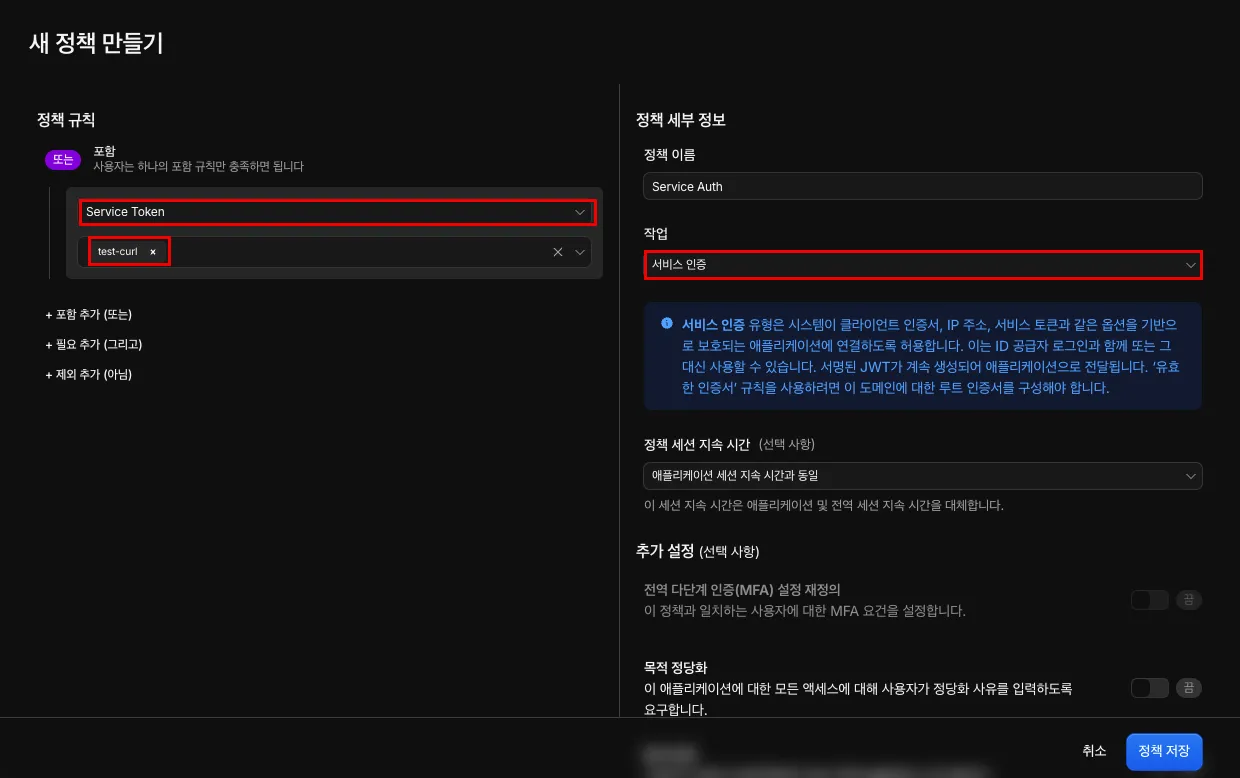
Now we need to create a policy. For the policy rule, choose “Service Token,” and for the value, choose the test-curl we just made. There’s one thing to watch out for when creating the policy. You have to change the Action from the default Allow to Service Auth, as in the image above. Allow is the action used when a person logs in, so if you put in only a service token and leave it as Allow, it tries to send you to a login page and doesn’t work properly. The screen even kindly shows a warning.
Once you finish the settings, press “Save policy,” then create the application, and
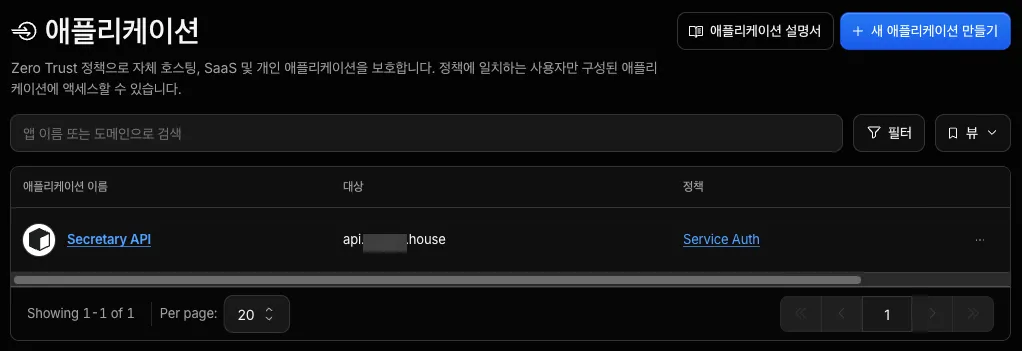
you can see the application was created successfully, like this.
Connecting a route
Now we need to register the new application with the tunnel. Go back to the Tunnels menu and select the tunnel you created earlier. Under the selected tunnel, there’s a screen where you can add routes.
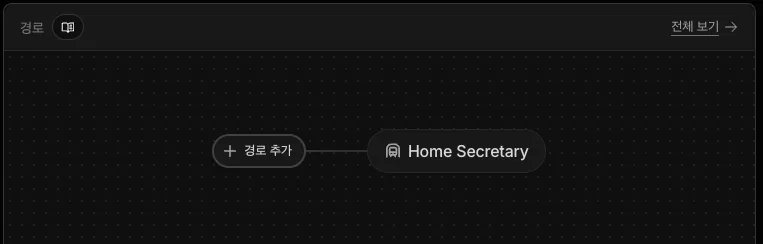
Press the Add route button to add the application we just created.
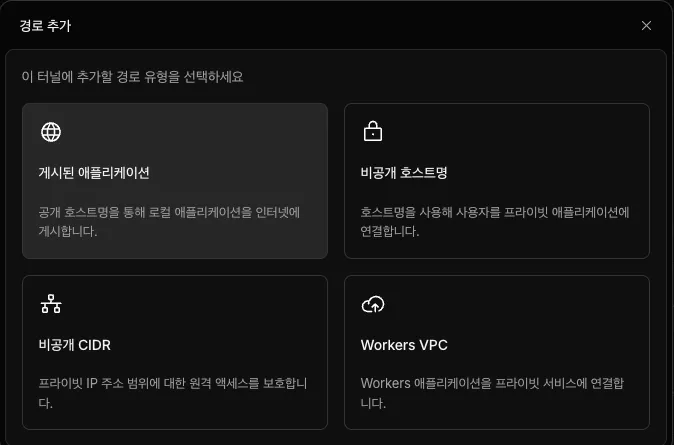
Select Published application.
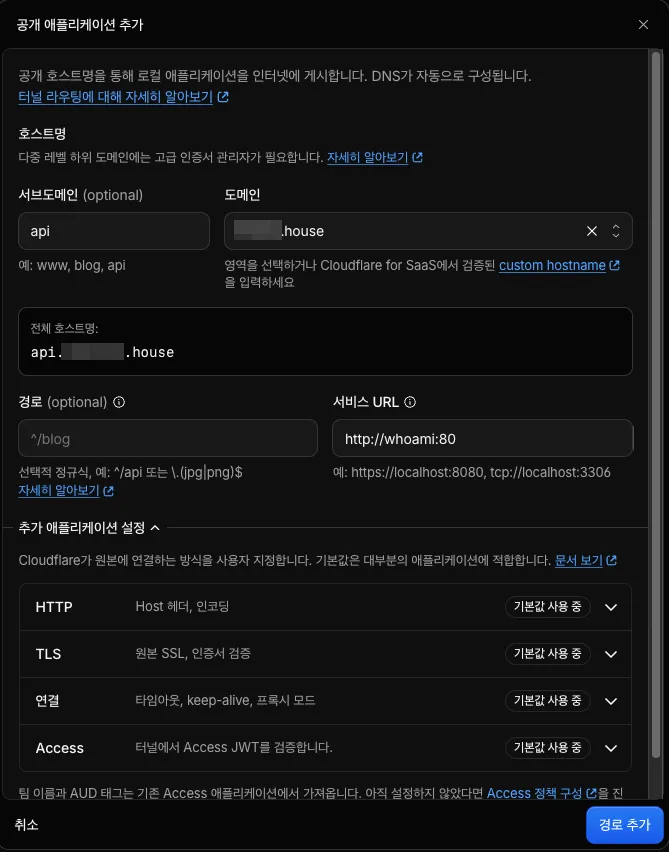
Enter the domain and the “Service URL” like this, then click “Add route.”
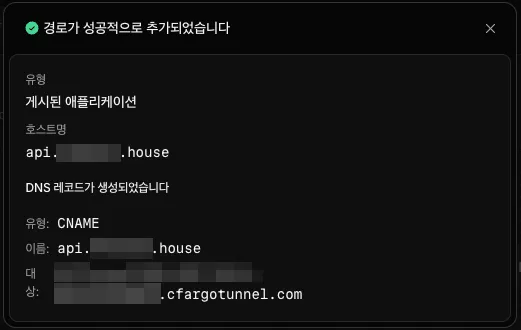
Check the message that it was added,
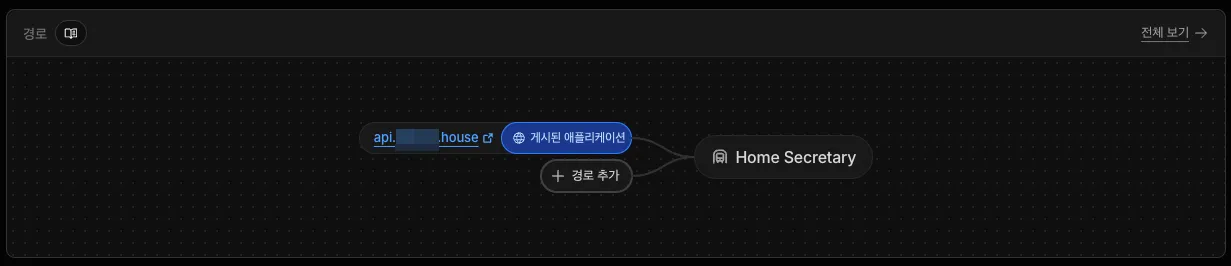
and you can see the result like this too.
And then test
# Without a token → 403 Forbiddencurl -i https://api.xxxxxxx.house
# With a token → 200curl -s https://api.xxxxxxx.house \  -H "CF-Access-Client-Id: <ID>" \  -H "CF-Access-Client-Secret: <SECRET>"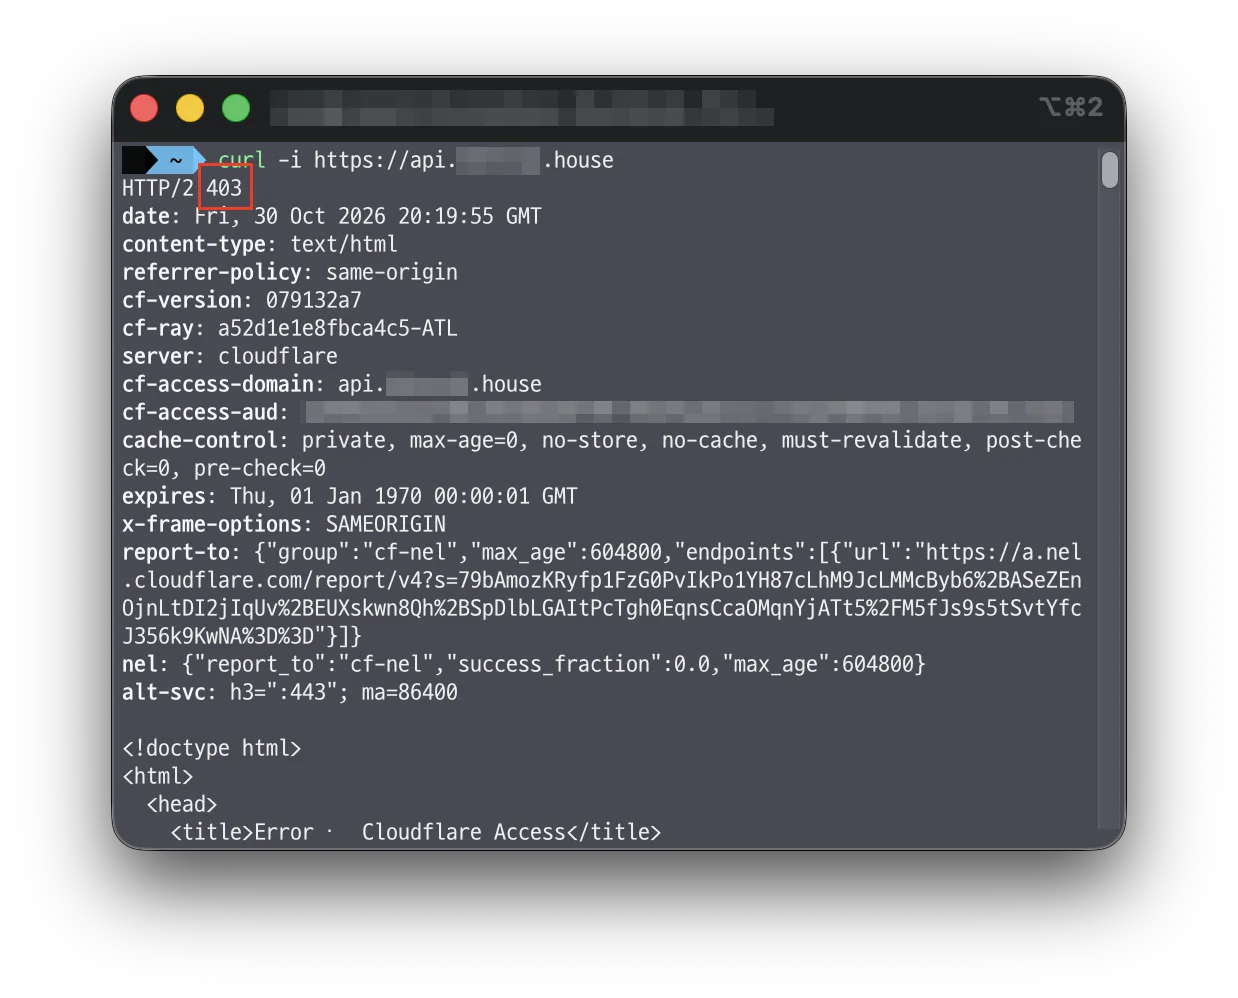
Send a request from the terminal without a token and you get a 403 response.
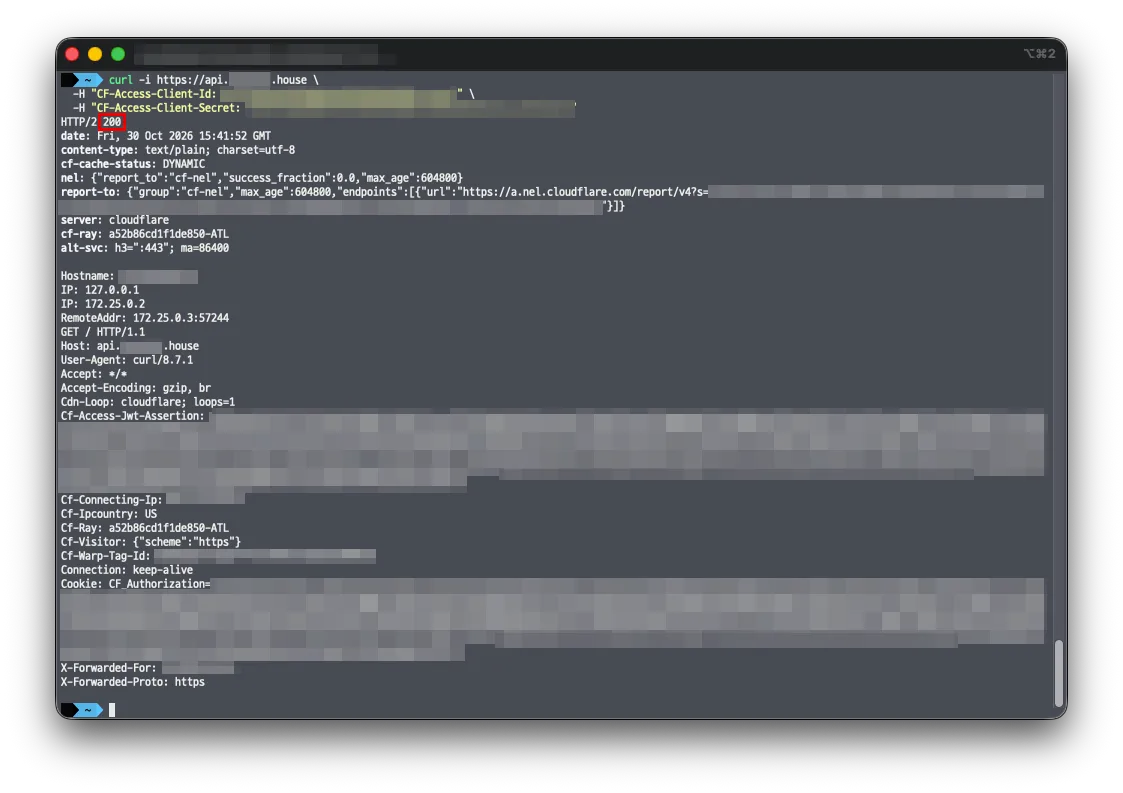 Send it from the terminal with the token and you can see a 200 response.
Worth adding
You can add an option to verify the JWT. If the service credential token is verified at the Access stage, the JWT token option makes cloudflared in my home Docker image verify it once more with a JWT token. Here’s how to add it.
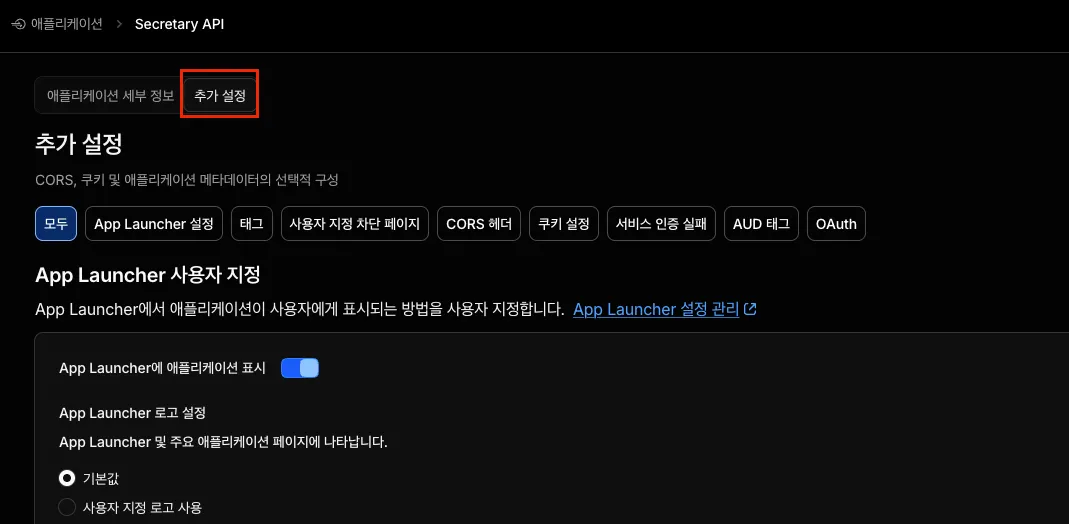
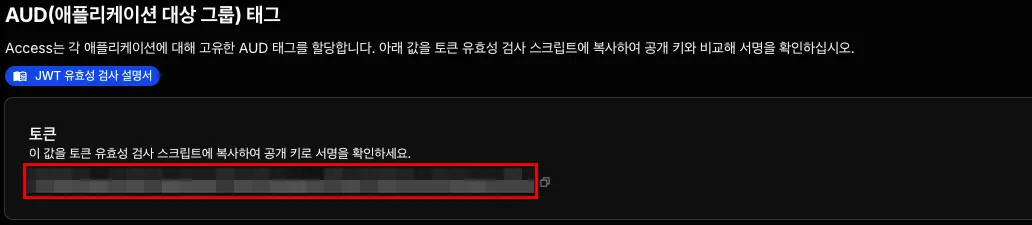
Go into the application and select Additional settings. Scroll down the screen and you’ll see an item called “AUD (Application Audience) Tag”; copy the token value there.
Then go back to the tunnel, open the “Routes” tab, and choose the “Edit route” menu.
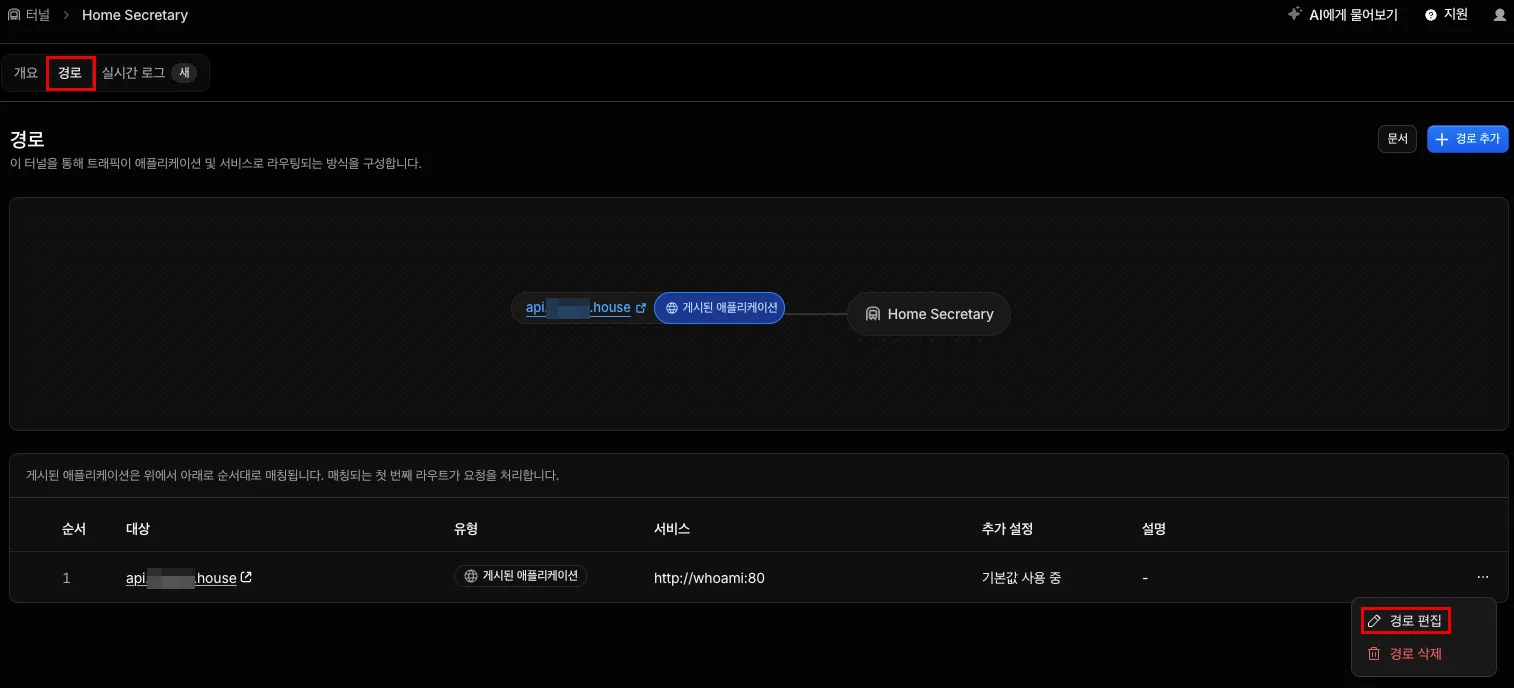
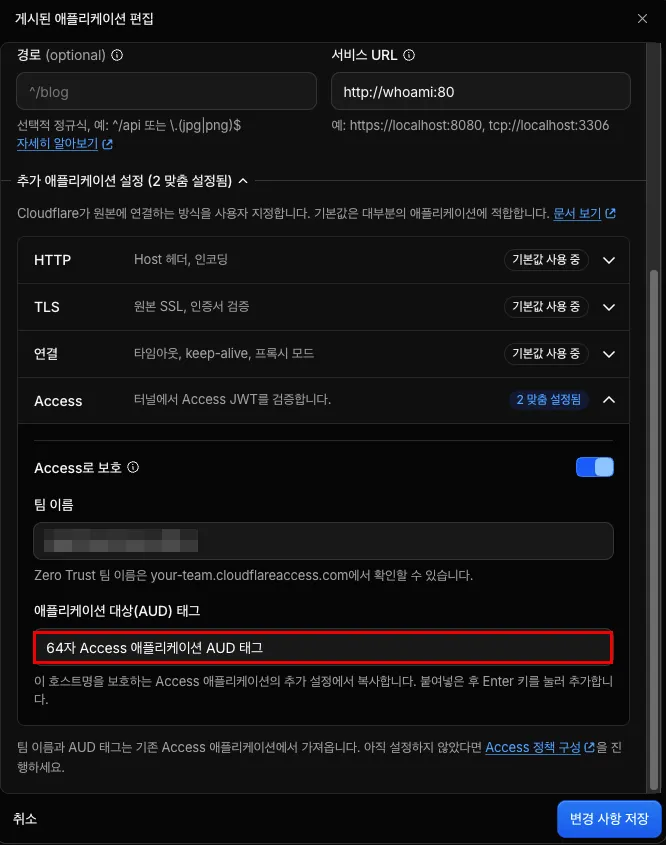
Put the code you just copied into Application Audience (AUD) Tag and save.
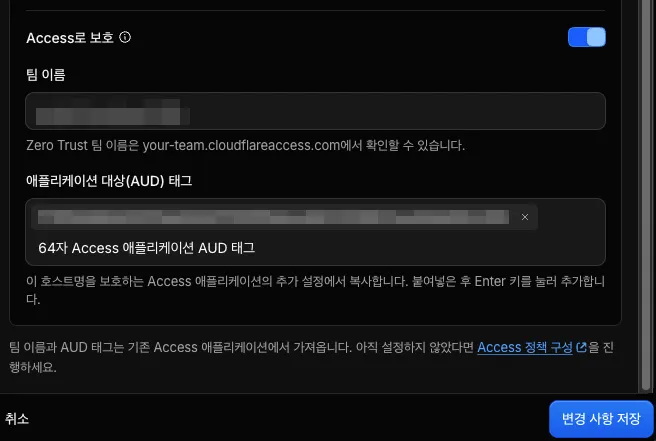
You must paste it, press the Enter key to turn it into a chip, and only then save. I didn’t know this and wasted a bunch of time on it. Dammit.
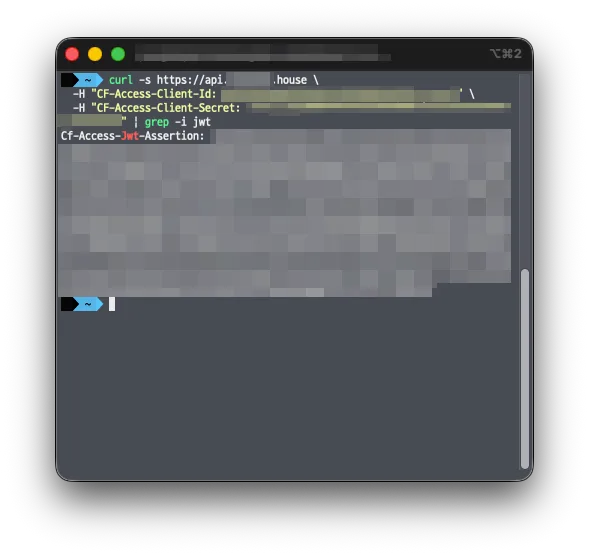
Then you’ll see a message that the route was saved successfully. Then test again in the terminal with the command below.
curl -s https://api.xxxxxxx.house \ -H "CF-Access-Client-Id: <new ID>" \ -H "CF-Access-Client-Secret: <new secret>" | grep -i jwtIt’s the earlier command with just grep -i jwt tacked on the end. If the test worked, a JWT value comes back like below.
The setup so far
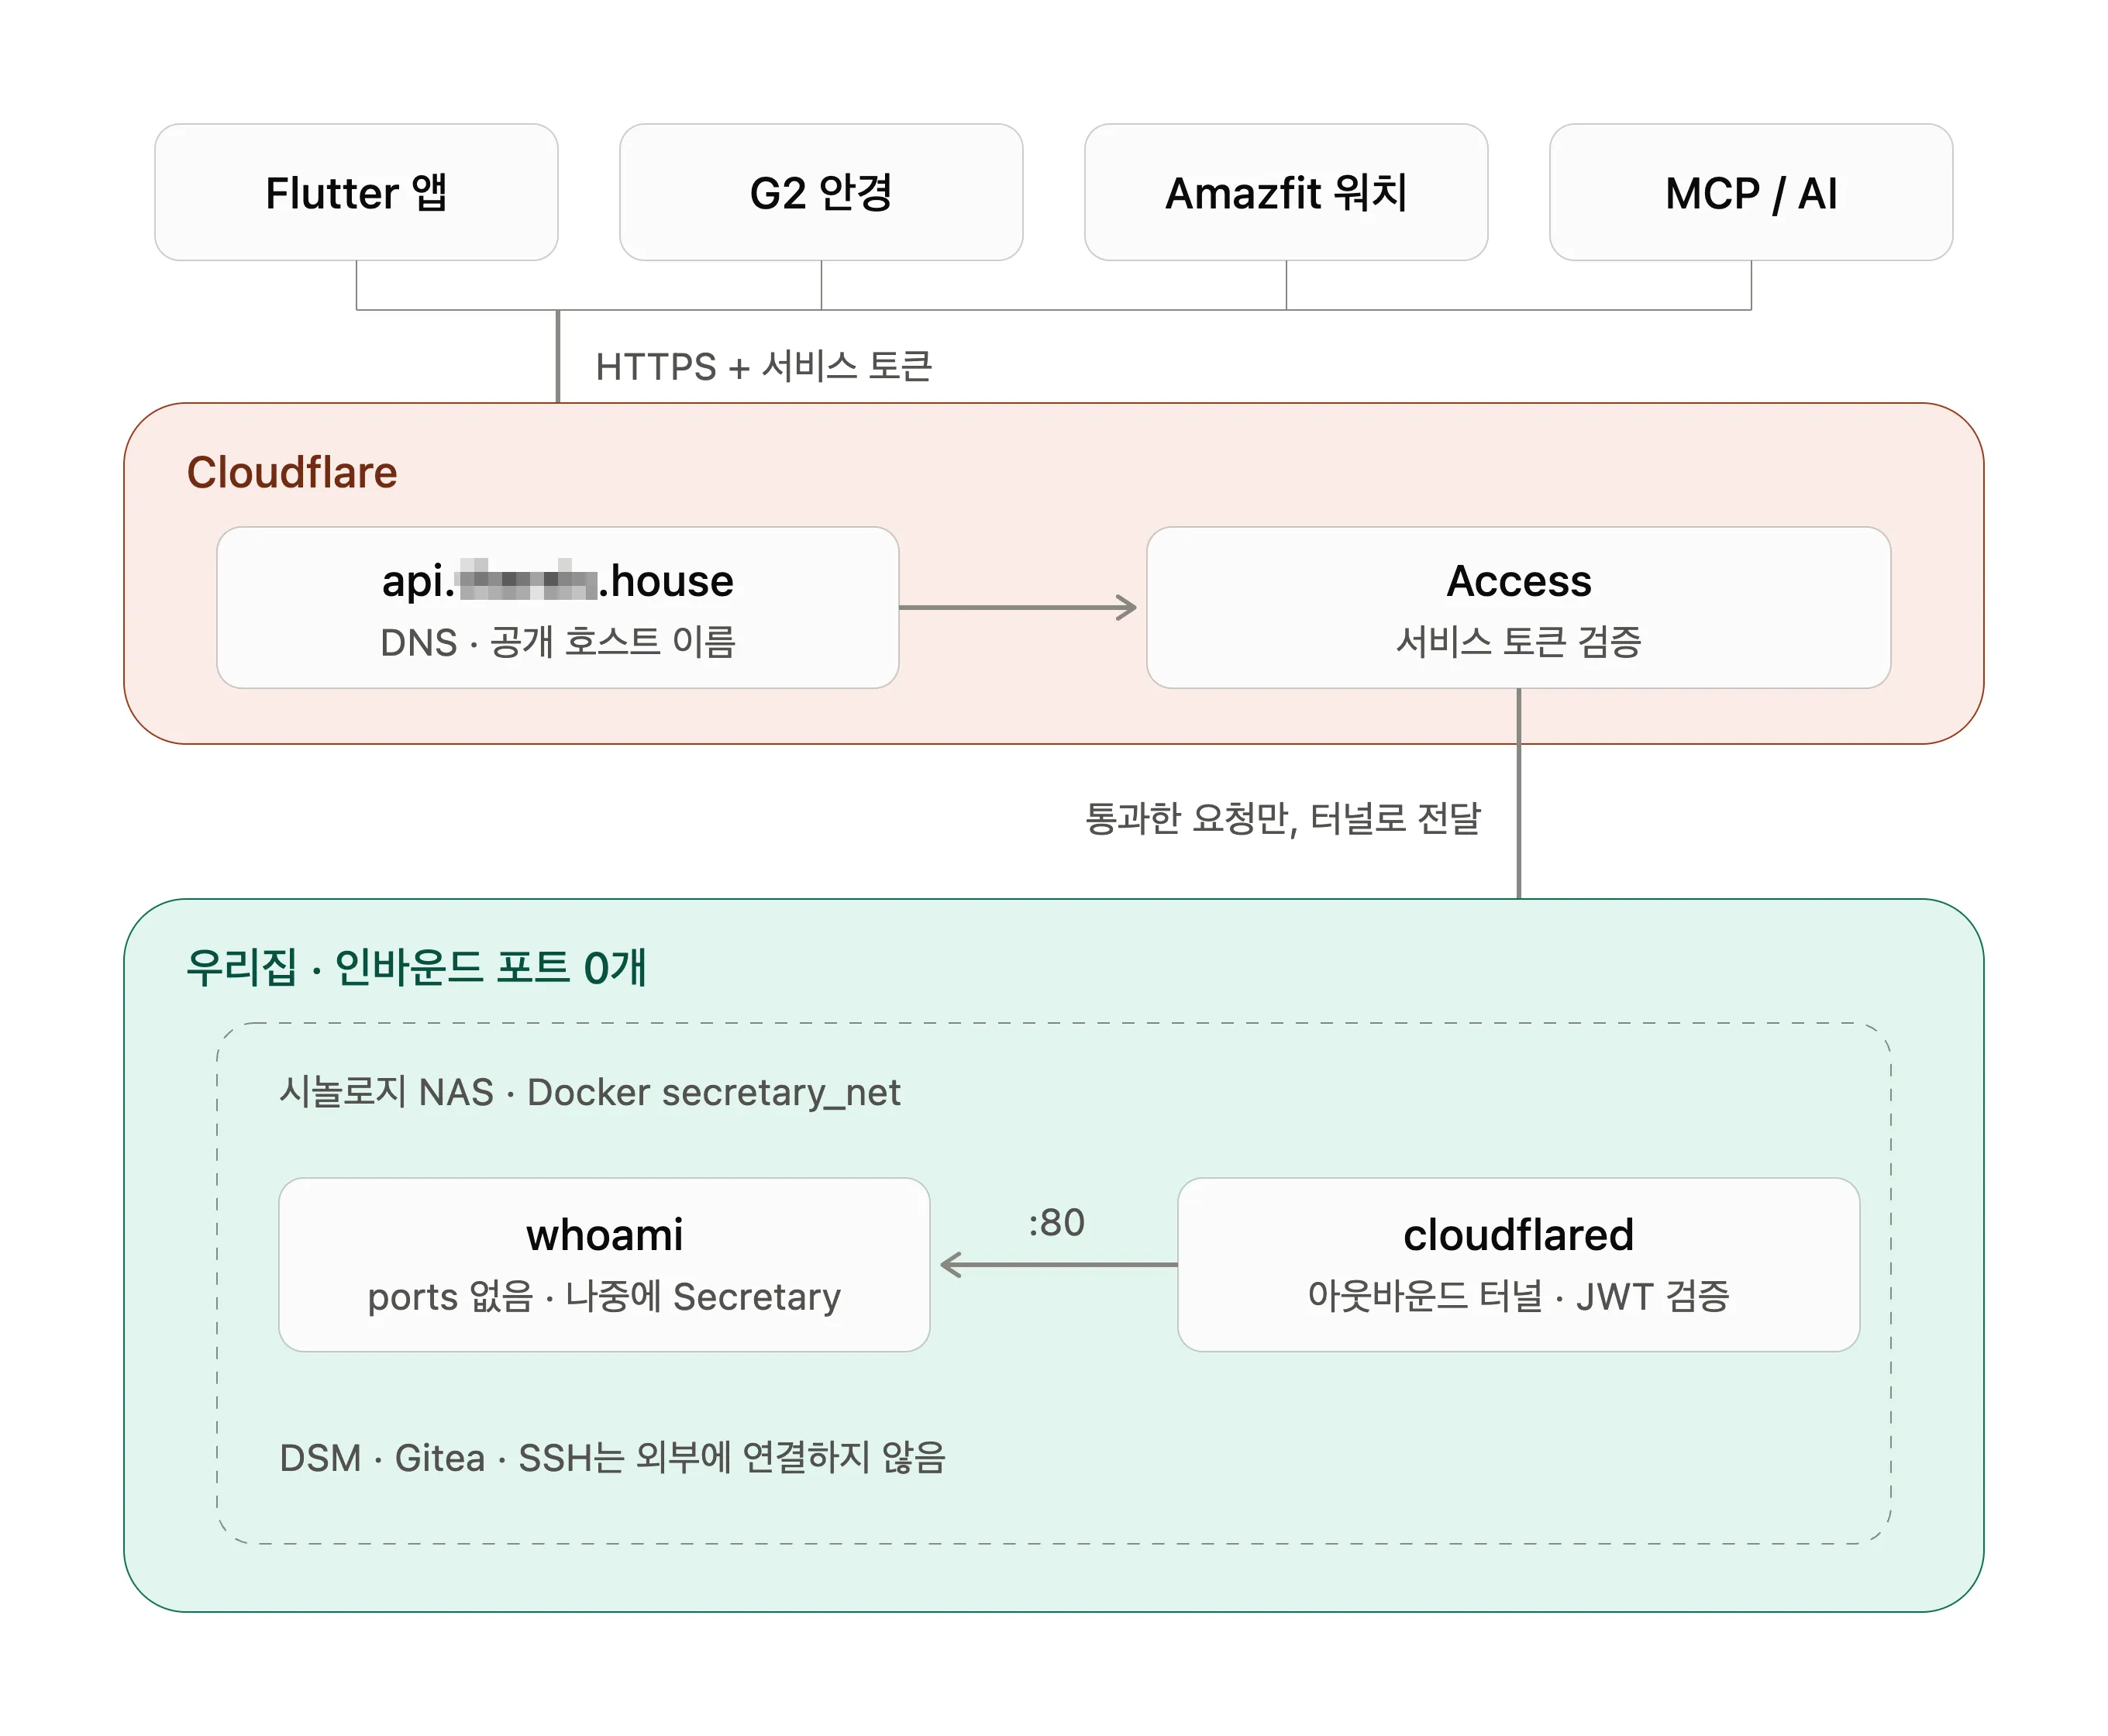 To sum up:
- Zero NAS ports. The tunnel was punched from the NAS outward, and the router opened nothing.
- Cloudflare Access turns away requests without a service token at the door.
- cloudflared verifies the Access JWT once more.
- The app container has no
portsand lives only inside the Docker network. - The cost is one domain. Everything else is free.
Phew, that was hard.

What I learned this time
- Test “is it blocked” before “does it work.” If I’d been satisfied that the request with the token succeeded, I’d have found out much later that the door was wide open.
- Layer your defenses. Don’t trust Access alone; with one more layer of JWT verification, you can hold up even if you make a mistake in one place.
In the next part, I’ll finally clear away whoami and put the Secretary server in its place. I plan to start with HMAC authentication and device keys, then SES email and Gitea/Obsidian integration.
Bye for now!

Loading comments...