 THEREiS
Title :
Setting Up an SSH Key for Github
This post is translated from the Korean original. Read in Korean →

How It Started
I use GitKraken as my Git client, but sometimes I can’t be bothered to launch the app, so I type Git commands in the CLI and push from there. And whenever I push to Github that way, I keep running into the same error. Here it is.
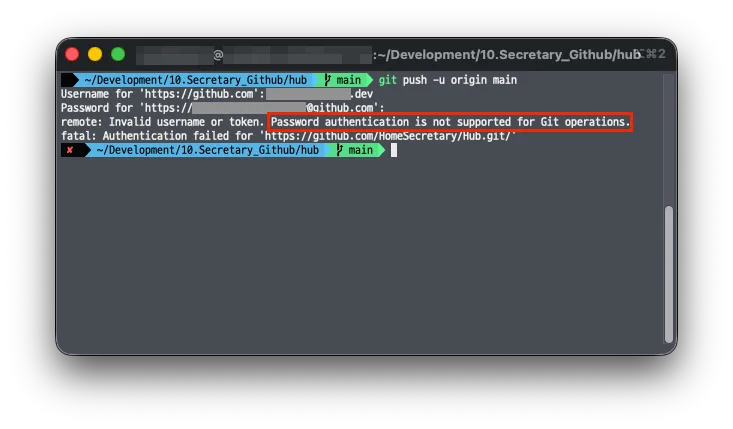 That
Password authentication is not supported for Git operations. error. Since August 2021, Github has officially stopped supporting push, clone, and pull with a username and password.
 (Nooo!!!)
Honestly, I don’t use Github much. I mostly use a private Git server, so I keep forgetting this. I kept telling myself I’d write it down someday, and only now have I finally gotten around to it (five years have gone by!).
I’m on a Mac, but things aren’t much different on Windows. You can learn how to create a key in my earlier post, Connecting to a Host with a Key Made by SSH Keygen, so I’ll skip that part here.
From here on, I’ll pick up the story after the key has been created.
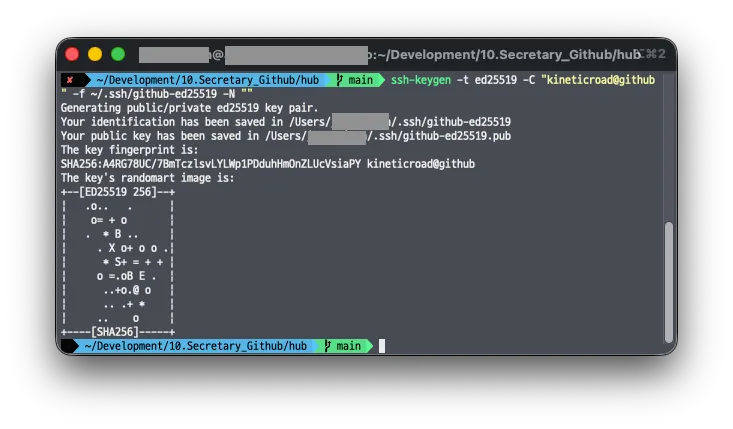 As you can see in the image above, the SSH key is ready. Now let’s register it with Github.
Windows 10 (version 1809 or later) and Windows 11 come with the OpenSSH client built in, so you can run ssh-keygen right away in PowerShell or the Command Prompt (cmd).
Registering the SSH Key with Github
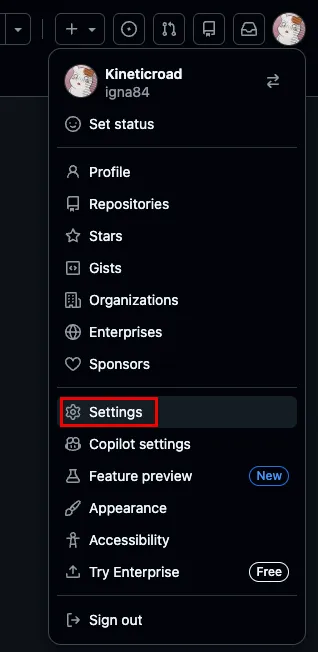
Once you log in to Github, you’ll see your profile picture in the top right corner. Click it and you’ll find the Settings menu.
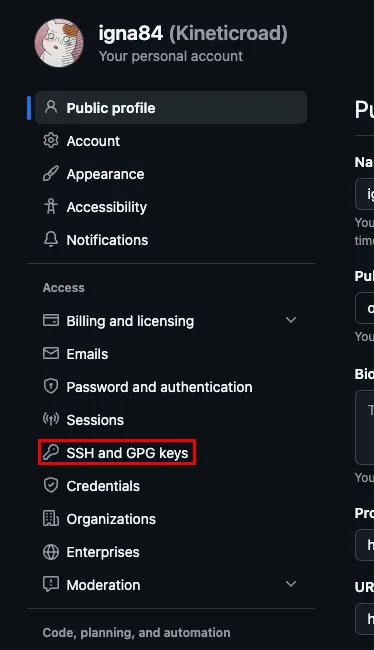
Inside Settings, you’ll see a menu called SSH and GPG keys in the side menu.
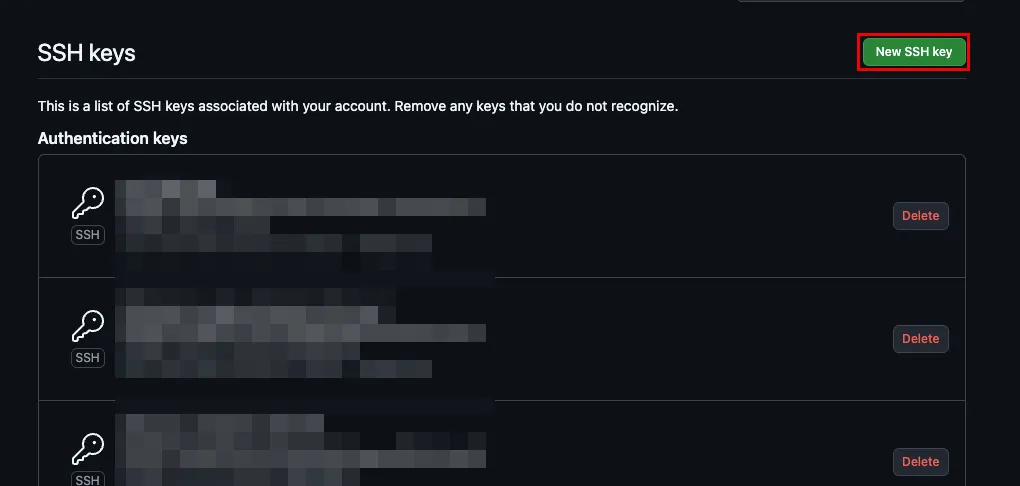
Open the SSH and GPG keys menu and you’ll see a list of the SSH keys registered so far (it’s empty if you haven’t registered any) and a button labeled New SSH key. Click the New SSH key button.
This brings up a screen where you can enter the SSH key you made earlier. The important thing here is to paste the contents of the file with the .pub extension. The public key, I mean. Never, ever paste anything that says PRIVATE KEY. Never! Ever!
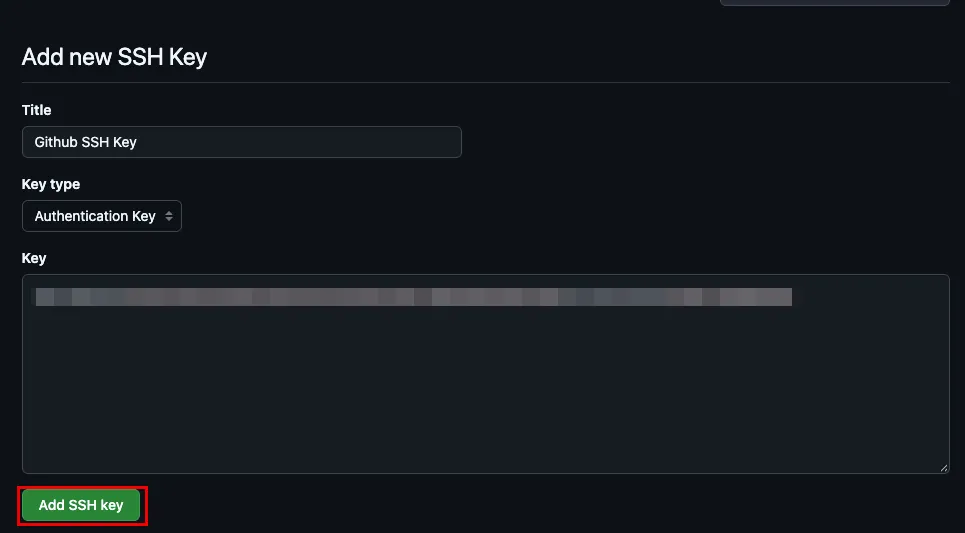
Enter the key and click the Add SSH key button, and that’s it for registering your SSH key with Github.
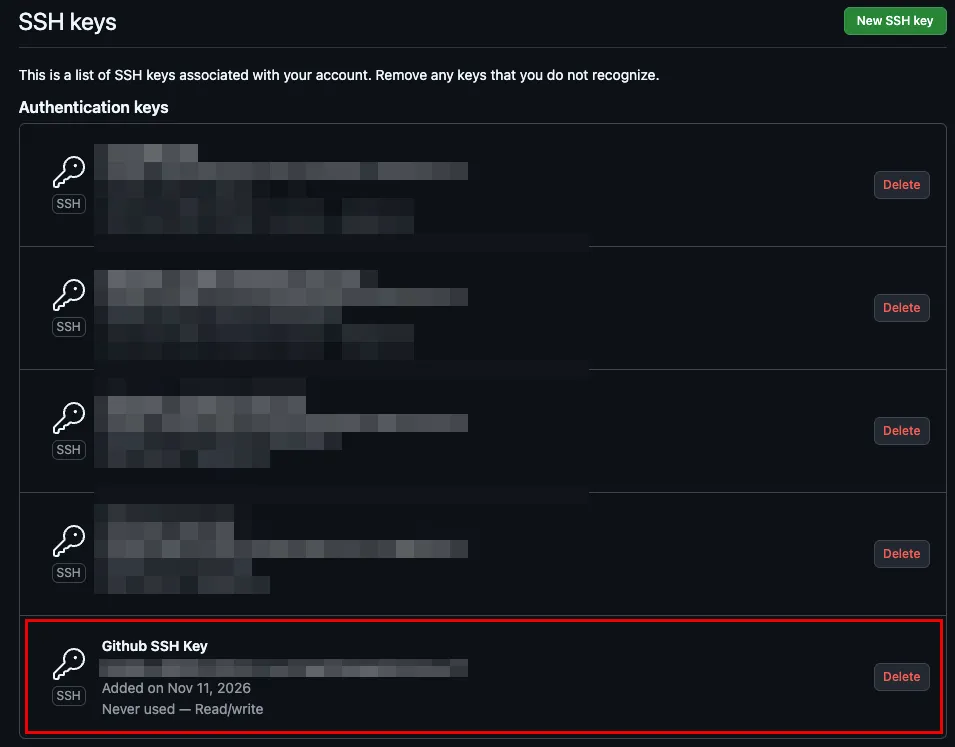
Now let’s push some code to Github with the SSH key I made.
Checking That the SSH Key Works
You can check that your SSH key works with the command below.
ssh -i ~/.ssh/{the key you just made} -T git@github.comType that in and you’ll see. I created my key with the name github-ed25519, and as shown below, the key worked fine.
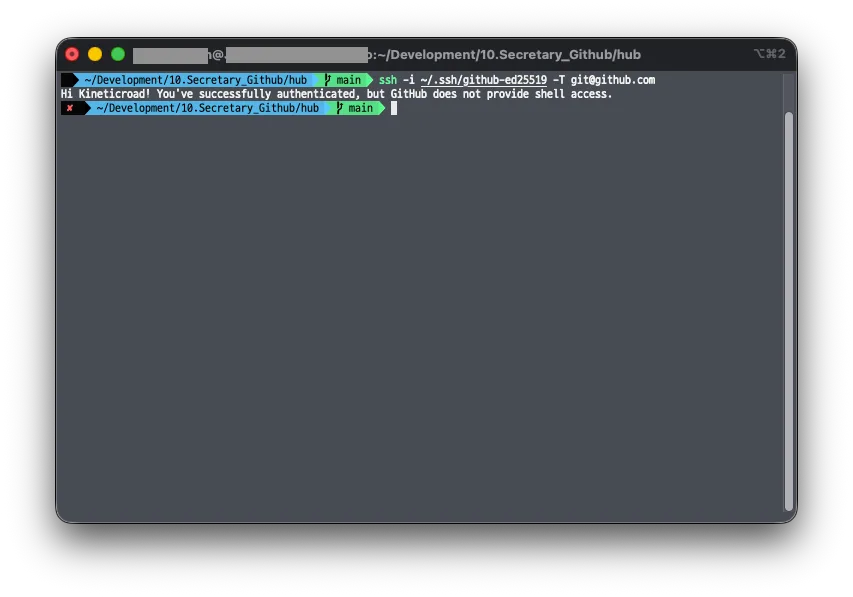 But if you look at the response, it says
but Github does not provide shell access.. This is no big deal. We tried to open an SSH terminal session on Github, and since we’re not supposed to (and can’t) get a terminal on Github’s servers, it shows this message. If you see the Hi {username}! You've successfully authenticated response, you can consider it a success.
Applying the SSH Key to a Repository
There are several ways to make Git use your SSH key. Let’s go over them one by one.
Specifying It for a Single Command (Global Setting)
The simplest way is to put the key you want in the GIT_SSH_COMMAND environment variable and put it in front of the Git command. That way, the key is used only when that command runs.
GIT_SSH_COMMAND="ssh -i ~/.ssh/github-ed25519 -o IdentitiesOnly=yes" git push origin mainMake sure you include IdentitiesOnly=yes here. Without this option, SSH first tries the other keys registered in ssh-agent, which can leave you authenticated as the wrong account, or kicked out with Too many authentication failures after too many attempts.
If typing all that every time is a pain, just put it in your shell config file (something like ~/.zshrc). Then every repository will use this key.
export GIT_SSH_COMMAND="ssh -i ~/.ssh/github-ed25519 -o IdentitiesOnly=yes"The catch is that the same key will also be used in places that need a different key, like a private Git server. If you use other Git servers besides Github like I do, the per-repository setting below is the better choice.
In PowerShell, set the environment variable first and then run the command.
$env:GIT_SSH_COMMAND = "ssh -i ~/.ssh/github-ed25519 -o IdentitiesOnly=yes"git push origin mainIn the Command Prompt (CMD), use set. Wrap the whole thing in quotes like "variable=value", and don’t put spaces around the =.
set "GIT_SSH_COMMAND=ssh -i ~/.ssh/github-ed25519 -o IdentitiesOnly=yes"git push origin mainIn both cases, the setting disappears when you close the window. If you want to keep it, save it as a user environment variable with setx. The saved value applies starting with newly opened windows.
setx GIT_SSH_COMMAND "ssh -i ~/.ssh/github-ed25519 -o IdentitiesOnly=yes"Don’t write the key path with backslashes like C:\Users\.... Git passes this value to a shell, which strips out the backslashes, and then the key file can’t be found. Use forward slashes, like ~/.ssh/... or C:/Users/....
Specifying It for One Repository Only (git config Setting)
If you use a different key for each repository, use the core.sshCommand setting. Run the command below once inside the repository folder, and from then on a plain git push will use the key you specified.
git config core.sshCommand "ssh -i ~/.ssh/github-ed25519 -o IdentitiesOnly=yes"git push origin mainThis setting is saved only in that repository’s .git/config file, so it doesn’t affect other repositories or your private Git server. If you open .git/config, you’ll see it in there like this.
[core] sshCommand = ssh -i ~/.ssh/github-ed25519 -o IdentitiesOnly=yesIf you haven’t cloned the repository yet, you can set it while cloning. A setting passed with the -c option is used for the clone itself and also saved as-is in the cloned repository’s .git/config.
git clone -c core.sshCommand="ssh -i ~/.ssh/github-ed25519 -o IdentitiesOnly=yes" git@github.com:{username}/{repository}.gitTo check that the setting went in, or to remove it, use the commands below.
# Check the current valuegit config --get core.sshCommand
# Remove the settinggit config --unset core.sshCommand
These commands work the same in PowerShell and CMD on Windows. Just remember, as mentioned earlier, to write the key path with forward slashes instead of backslashes.
Check these two things.
- Whether the remote URL is HTTPS: If
git remote -vshows a URL starting withhttps://, SSH isn’t used at all. Change it to the SSH URL withgit remote set-url origin git@github.com:{username}/{repository}.git. - Whether a
GIT_SSH_COMMANDenvironment variable is still set: The environment variable takes priority overcore.sshCommand. If you set it globally earlier withexportorsetx, the repository setting is ignored.
Let’s Push
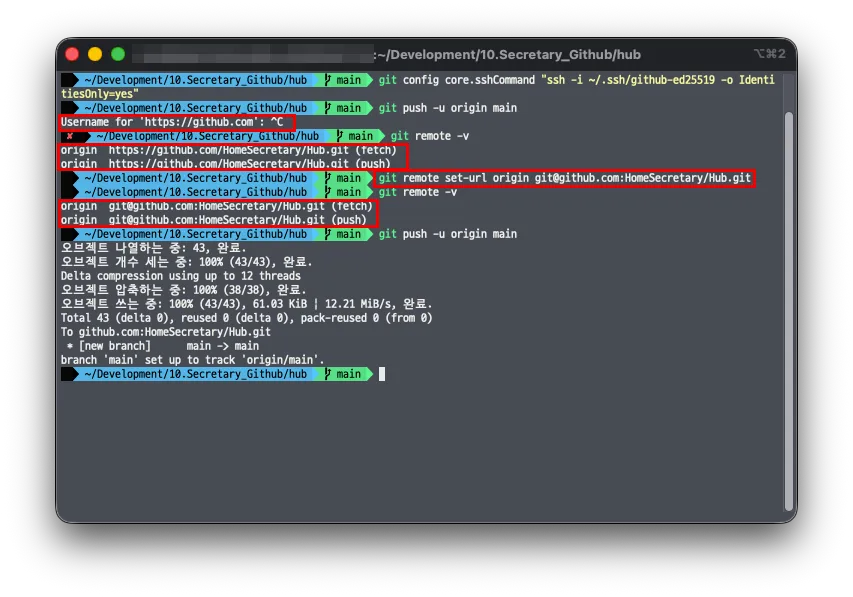 I registered the key for the repository only and tried to push. But because I had set the remote to an https URL earlier, it asked me to enter a
Username. I checked where the remote was pointing with git remote -v and changed it to the SSH URL with git remote set-url. After that, the push went through just fine.
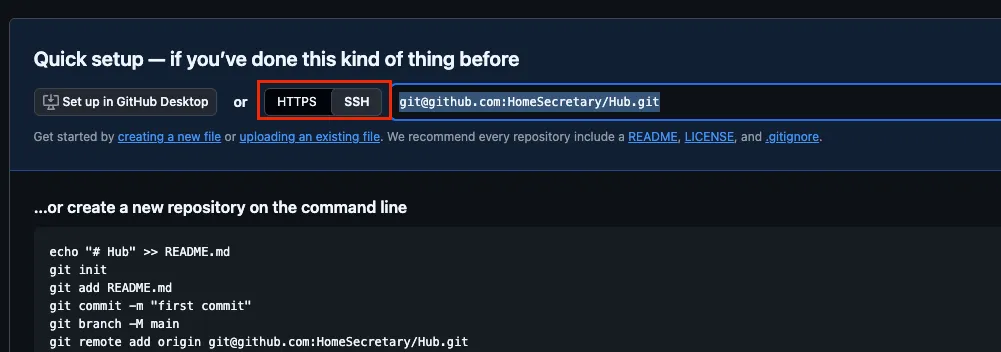
As you can see in the image, you can toggle between the HTTPS and SSH URLs, so just copy that URL and use it.
Wrapping Up
I’d been meaning to write up how to set up an SSH key for Github someday, and I’ve finally done it. It feels like having a sore tooth pulled. Registering an SSH key is a real hassle, but it’s the right way to go for security. If it were a Git server only I used, maybe, but if you authenticate with a username and password to repositories on Github, which people all over the world use, someone could even spread malware across the world. So I think it’s worth us generous folks putting in a little extra effort to be part of a safer internet.
Bye!

Loading comments...