 THEREiS
Title :
Connecting to a Host with a Key Made by SSH Keygen
This post is translated from the Korean original. Read in Korean →

This morning I was about to create a new key and put it on a server, and I couldn’t remember a single ssh-keygen option. When I searched, I found a mix of posts that just tossed out a command, posts that went on and on about concepts, and posts written for how things were years ago, with nowhere that had it all in one place. So I’m writing it all down in one place for the next me.
Here’s the order.
- What an asymmetric key is
- Why you create SSH keys, and what actually happens when you connect
- Creating a key the simplest way
- Choosing a key type when creating one
- What AWS
.pemkeys really are - Troubleshooting when you can’t connect
1. What is an asymmetric key?
There are two broad kinds of encryption.
- Symmetric key: Uses the same key to lock and unlock. It’s fast, but the problem is how to deliver that key safely to the other side.
- Asymmetric key: Two different keys are bound together as a pair. One is the public key, and the other is the private key.
Asymmetric keys have just one core rule.
Whatever is processed with one key can be unlocked or verified only with its matching key.
This rule is used in two directions.
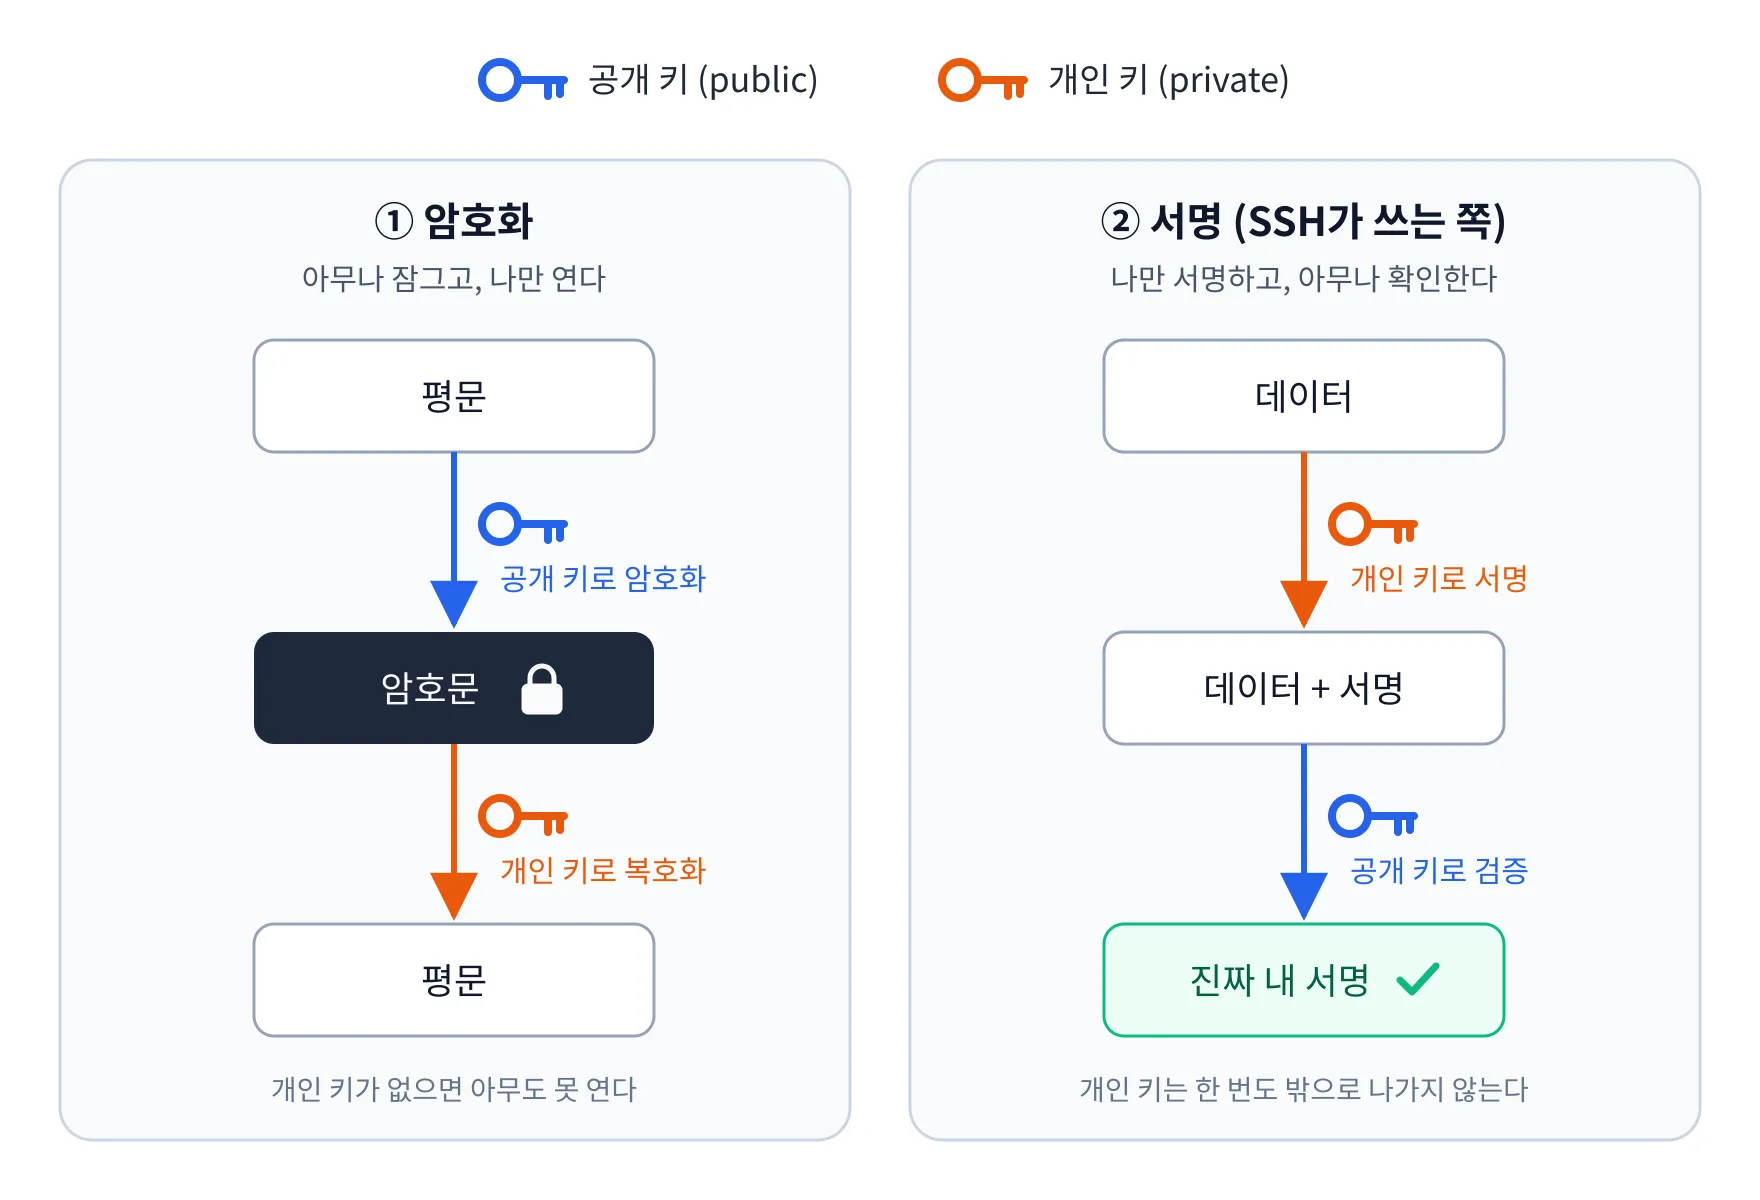
- The public key, as the name says, can be made public. You can put it on servers, register it with GitHub, and send it to coworkers.
- The private key must never leave your computer. Whoever holds the private key is “you.”
SSH login uses ②, the signing side. It proves “I have the private key that pairs with this public key” without ever sending the private key itself. It’s easy to think of it as a lock (the public key) hanging on the server’s door, with the key (the private key) only in your pocket.
2. Why create keys with ssh-keygen
Logging in with a key instead of a password
SSH is a protocol for connecting to a remote server’s terminal. You can connect with a password, but that has plenty of problems.
- The password travels over the network to the server every time (although inside an encrypted channel).
- It’s short enough for a human to remember, so it’s weak against brute-force attacks. Leave port 22 open and you’ll get thousands of login attempts a day.
- It’s inconvenient for connecting automatically from scripts or CI.
When you log in with a key, the private key never leaves your computer, and guessing a key thousands of bits long by brute force is practically impossible. That’s why you create a key pair with ssh-keygen and register the public key on the server.
authorized_keys: the server’s guest list
The server keeps the list of “the owners of these public keys may come in” in the following file in the user’s home directory.
~/.ssh/authorized_keysThe file contents are just text with one public key per line.
ssh-ed25519 AAAAC3NzaC1lZDI1NTE5AAAAI... test@macbookssh-ed25519 AAAAC3NzaC1lZDI1NTE5AAAAI... thereis@nasIf you want to connect as the deploy account, your public key needs to be in /home/deploy/.ssh/authorized_keys. Remember that each account has its own list.
What happens when you connect with a key
When you type ssh deploy@server, this is what actually goes on.
To sum up, keys show up twice in an SSH connection.
| Stage | Who checks whom | File used |
|---|---|---|
| Host authentication (steps 2–3) | The client checks the server (“Is this really the server I meant to connect to?”) | The client’s ~/.ssh/known_hosts |
| User authentication (steps 6–10) | The server checks the client (“Are you really allowed in?”) | The server’s ~/.ssh/authorized_keys |
On neither side does the private key itself go out over the network. Only public keys and signatures go back and forth.
3. Creating a key simply with ssh-keygen
Just make one
Run it with no options.
ssh-keygenGenerating public/private ed25519 key pair.Enter file in which to save the key (/Users/test/.ssh/id_ed25519):Enter passphrase for "/Users/test/.ssh/id_ed25519" (empty for no passphrase):Enter same passphrase again:Your identification has been saved in /Users/test/.ssh/id_ed25519Your public key has been saved in /Users/test/.ssh/id_ed25519.pubThere are two questions.
- Save location: Press Enter and it’s saved in the default location (
~/.ssh/id_<type>). If a key with the same name already exists, it asks whether to overwrite it, and if you typeyhere, the existing key is gone. Be careful. - Passphrase: A password that locks the private key file itself. Even if you lose your laptop, the key file alone can’t be used. I recommend setting one for personal keys, and leaving it empty for keys used where no human can type it, like CI.
The result is two files.
| File | What it is | Where it goes |
|---|---|---|
id_ed25519 |
Private key | Only on your computer. Permissions 600 |
id_ed25519.pub |
Public key | The server’s authorized_keys, GitHub, etc. |
Note: Starting with OpenSSH 9.5, the default key type changed from RSA to Ed25519. Older posts that say an
id_rsagets created are based on earlier versions. You can check your version withssh -V.
Creating one with common options
Once you have several keys, it’s a good idea to give them names and notes.
ssh-keygen -t ed25519 -C "test@macbook-nas" -f ~/.ssh/nas_ed25519| Option | Meaning |
|---|---|
-t |
Key type (ed25519, rsa, ecdsa …) |
-b |
Key length (bits). Only meaningful for RSA and ECDSA |
-C |
Comment. Appended to the end of the public key, telling you “whose key was this again?” |
-f |
File path to save to |
-N |
Set the passphrase right in the command (-N "" means no passphrase) |
Registering the public key on the server
The easiest way is ssh-copy-id. You still need to be able to connect with a password at this point.
ssh-copy-id -i ~/.ssh/nas_ed25519.pub deploy@192.168.0.10This command does it all: creating the ~/.ssh folder on the server, adding the public key to authorized_keys, and setting the permissions. If ssh-copy-id isn’t available, you can add it yourself.
cat ~/.ssh/nas_ed25519.pub | ssh deploy@192.168.0.10 \ "mkdir -p ~/.ssh && chmod 700 ~/.ssh && cat >> ~/.ssh/authorized_keys && chmod 600 ~/.ssh/authorized_keys"Now try connecting with the key.
ssh -i ~/.ssh/nas_ed25519 deploy@192.168.0.10Handy extra commands
# Regenerate the public key from the private key (when you've lost the .pub file)ssh-keygen -y -f ~/.ssh/nas_ed25519 > ~/.ssh/nas_ed25519.pub
# Check the key's fingerprintssh-keygen -lf ~/.ssh/nas_ed25519.pub
# Change the passphrase (also how you add one if there was none)ssh-keygen -p -f ~/.ssh/nas_ed25519
# Remove the old entry from known_hosts when the host key changed after reinstalling the serverssh-keygen -R 192.168.0.10
4. Key types you can create with ssh-keygen
These are the key types you can pick with the -t option.
Type (-t) |
Key length (-b) |
Characteristics | Recommendation |
|---|---|---|---|
ed25519 |
Fixed (256 bits) | Short, fast, and secure. The current default | ✅ Use this by default |
rsa |
Default 3072, 4096 recommended | The oldest, with the best compatibility. Long keys | Old devices, some clouds |
ecdsa |
256 / 384 / 521 | Elliptic curve. Required in some environments | Only with a specific reason |
ed25519-sk |
Fixed | The private key is bound to a FIDO security key like a YubiKey | If you have a hardware key |
ecdsa-sk |
Fixed | Same as above, but ECDSA. For security keys that don’t support Ed25519 | When your security key lacks Ed25519 |
dsa |
Fixed at 1024 | Weak, and support was removed entirely in OpenSSH 10.0 | ❌ Don’t use it |
Creating a key of a specific type
# Ed25519 (the safe choice)ssh-keygen -t ed25519 -C "test@macbook"
# RSA 4096-bit (when you need compatibility with old servers or devices)ssh-keygen -t rsa -b 4096 -C "test@macbook"
# ECDSA 521-bit (careful: it's 521, not 512)ssh-keygen -t ecdsa -b 521 -C "test@macbook"
# A key bound to a FIDO security key (YubiKey, etc.). You have to touch the key every time you connectssh-keygen -t ed25519-sk -C "test@yubikey"
When in doubt, just use ed25519, and drop down to rsa -b 4096 only when the other side says “we don’t support that key type.”
5. About AWS pem keys
When you create an AWS EC2 instance, it asks you to pick or create a key pair. If you create a new one, it lets you download a file like my-key.pem exactly once. Once you know what this file really is, there’s nothing confusing about it.
pem file = private key
A .pem isn’t anything special; it’s a private key that AWS made for you. PEM is just the name of a format that stores a key as text starting with -----BEGIN ... PRIVATE KEY-----.
So when you create a key pair on AWS, this is what happens.
In the end, AWS just did for you what we did earlier with ssh-keygen + ssh-copy-id. So connecting works the same way.
chmod 400 my-key.pemssh -i my-key.pem ec2-user@3.35.xxx.xxxThe default user name differs by AMI.
| AMI | Default user |
|---|---|
| Amazon Linux | ec2-user |
| Ubuntu | ubuntu |
| Debian | admin |
| RHEL | ec2-user |
Good to know about pem keys
-
AWS won’t give you the private key again. If you lose the pem file, there’s no way to get it back. You have to recover by getting in through EC2 Instance Connect or Systems Manager (SSM) and adding a new public key to
authorized_keys. -
You can extract the public key from a pem. If you want to get into other servers with the same key, do this.
터미널 ssh-keygen -y -f my-key.pem > my-key.pub -
You can also upload your own key to AWS. Paste the contents of the
.pubyou made withssh-keygeninto Key pairs → Import key pair in the EC2 console. AWS never touches the private key, so this is the cleaner option. -
.ppkis the PuTTY format. You only need it when using PuTTY on Windows; on Mac or Linux, pick.pem. -
When creating a key pair, you can choose between RSA and ED25519, but Windows instances don’t support ED25519. For Linux instances, go with ED25519.
6. Troubleshooting connections to remote hosts
If you’ve created and registered the key and still get Permission denied (publickey), run this first.
ssh -v deploy@192.168.0.10 # -vvv for even more detailIt shows everything: which config the client read, which keys it tried, and what the server answered. If you can get onto the server another way, check the server logs too and the cause will show up right away.
# Ubuntu / Debiansudo tail -f /var/log/auth.log# or (on systemd)sudo journalctl -u ssh -f # -u sshd on RHEL-based systems6-1. ssh_config issues
There are two kinds of SSH config files, and their names are similar enough to be confusing.
| File | Side | Role |
|---|---|---|
~/.ssh/config, /etc/ssh/ssh_config |
Client | Options used when you connect |
/etc/ssh/sshd_config |
Server (d = daemon) |
Rules the server uses when accepting connections |
Client: ~/.ssh/config
Typing -i, -p, and the user name every time gets old, so people usually set it up like this.
Host nas    HostName 192.168.0.10    User deploy    Port 2222    IdentityFile ~/.ssh/nas_ed25519    IdentitiesOnly yes
Host aws-web    HostName 3.35.xxx.xxx    User ec2-user    IdentityFile ~/.ssh/my-key.pem    IdentitiesOnly yes
Host *    ServerAliveInterval 60
Now you just type ssh nas. Here are the traps people often fall into.
① Too many authentication failures
If you have several keys, ssh tries not only the key set with IdentityFile but every key in ssh-agent, one by one. Servers usually limit attempts to 6 (MaxAuthTries), so you get kicked out before presenting the right key. Add IdentitiesOnly yes and it uses only the specified key.
② The setting written first wins
In ssh_config, when the same option appears more than once, the first value is used. So if you put something like User root under Host * at the very top, the User deploy you wrote under Host nas below is ignored. Always put the common Host * settings at the very bottom.
When you’re confused, print the final settings that will actually apply.
ssh -G nas | grep -Ei '^(user|hostname|port|identityfile)'③ config file permissions
If ~/.ssh/config is writable by other users, ssh throws a Bad owner or permissions on ~/.ssh/config error and won’t even try to connect.
chmod 600 ~/.ssh/configServer: /etc/ssh/sshd_config
If the key is right and it still doesn’t work, suspect the server config.
PubkeyAuthentication yes # Allow key login (default yes)AuthorizedKeysFile .ssh/authorized_keys # Location of the public key listPasswordAuthentication no # Once keys are registered, block password loginPermitRootLogin prohibit-password # root by key only (no to block it entirely)There’s one trap that catches people all the time here: you edited sshd_config but the change doesn’t take effect. Distributions these days have a line like this at the very top of sshd_config.
Include /etc/ssh/sshd_config.d/*.confIn sshd_config too, the first value wins, so if a file inside sshd_config.d/ (e.g. 50-cloud-init.conf on cloud images) contains PasswordAuthentication yes, changing it to no in the main file does nothing. Check the values actually in effect like this.
sudo sshd -T | grep -Ei 'passwordauthentication|pubkeyauthentication|authorizedkeysfile'After changing the config, stick to the order syntax check → restart. If you restart with a syntax error, sshd won’t come up and you may not be able to get back into the server. When restarting, don’t close your current session; confirm you can connect from a new terminal before closing it.
sudo sshd -t && sudo systemctl restart ssh # sshd on RHEL-based systems6-2. The 777 permissions issue with authorized_keys
The moment you fire off chmod 777 thinking “maybe it’s a permissions thing?”, it’ll never work. This is the most frustrating case.
sshd has an option called StrictModes that’s on by default. If any of the authorized_keys file, the ~/.ssh folder, or the home directory is writable by others, it doesn’t trust that list. Because it means someone could sneak their own public key into that file.
So if you open it up to 777, the client just sees Permission denied (publickey), and the server log gets a line like this.
Authentication refused: bad ownership or modes for file /home/deploy/.ssh/authorized_keysThe fix is to narrow the permissions.
chmod 755 ~ # or 750. The point is removing write access for group/others (chmod go-w ~)chmod 700 ~/.sshchmod 600 ~/.ssh/authorized_keyschown -R deploy:deploy ~/.ssh # If you created the files with sudo, the owner may be rootHere are the permissions you need to get right on the server and client, all in one place.
| Location | Target | Permissions | When wrong |
|---|---|---|---|
| Server | Home directory ~ |
755 or tighter (no group/other write) |
bad ownership or modes in the server log |
| Server | ~/.ssh |
700 |
Same as above |
| Server | ~/.ssh/authorized_keys |
600 |
Same as above |
| Client | ~/.ssh |
700 |
|
| Client | Private key (id_ed25519, *.pem) |
600 or 400 |
UNPROTECTED PRIVATE KEY FILE! |
| Client | Public key (*.pub) |
644 |
|
| Client | ~/.ssh/config |
600 |
Bad owner or permissions |
The client side checks the private key for the same reason. A downloaded pem file is usually 644, so you’ll almost certainly see this warning the first time you connect.
WARNING: UNPROTECTED PRIVATE KEY FILE!Permissions 0644 for 'my-key.pem' are too open.This private key will be ignored.chmod 400 my-key.pemIf you’ve fixed all the permissions and it still doesn’t work on RHEL / Rocky / CentOS, it may be an SELinux label issue. If you created the
.sshfolder yourself, try restoring the labels withrestorecon -Rv ~/.ssh.
Wrapping up
The next time I forget, this part is all I need.
# 1. Create a keyssh-keygen -t ed25519 -C "me@device" -f ~/.ssh/servername_ed25519
# 2. Register the public key on the serverssh-copy-id -i ~/.ssh/servername_ed25519.pub user@server
# 3. Connectssh -i ~/.ssh/servername_ed25519 user@server
# If it doesn't workssh -v user@server # What's happening on the clientsudo tail -f /var/log/auth.log # What's happening on the serverchmod 700 ~/.ssh && chmod 600 ~/.ssh/authorized_keys # Never use 777- The public key is the lock, the private key is the key. Hang the lock on the server’s
authorized_keys, and keep the key only in your pocket. - An AWS
.pemis just a private key that AWS made for you. - Permission problems are solved by narrowing permissions, not widening them.
Phew, now I won’t need to sort out SSH keys again for five years. Bye for now!

Loading comments...